Mastodon keeps growing. It is one of the most popular open, ad-free platforms in the fediverse. Its timeline is clean and chronological. No algorithm buries your posts. That makes it a smart place to send your content.
But manual cross-posting is a chore. You publish a blog post. Then you copy the title, paste the link, and write a caption. Then you repeat it all next time. It is slow, and it is easy to forget.
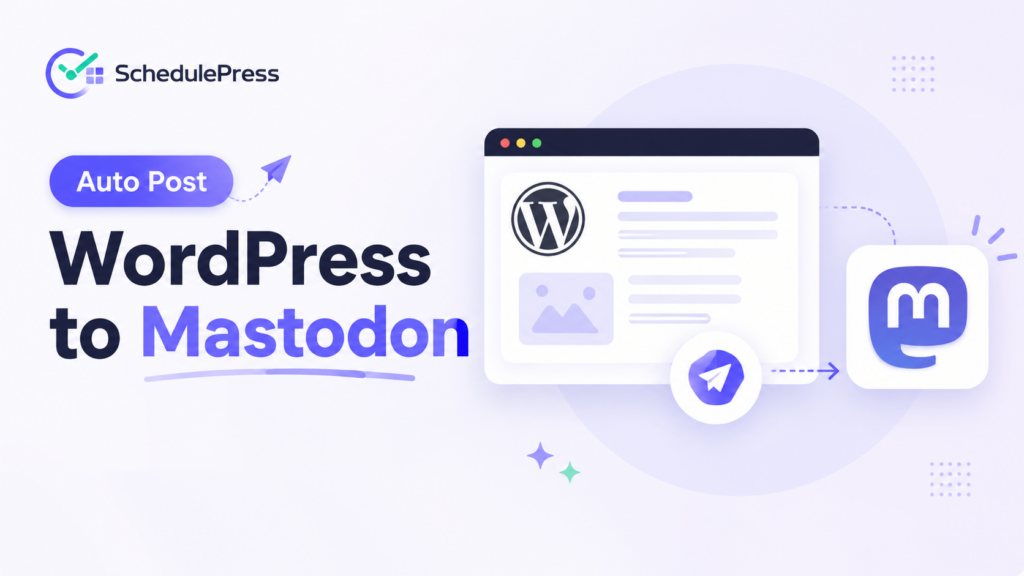
There is a faster path. With SchedulePress, you can automatically post from WordPress to Mastodon. You connect your account once. After that, every article can go from WordPress to Mastodon on its own. This guide walks you through the WordPress Mastodon integration, step by step.
A Quick Summary/TL;DR
Cross-posting to Mastodon by hand is slow and easy to forget. SchedulePress removes that work. Connect your Mastodon account once, set a template, and every WordPress post can publish to Mastodon on its own, complete with a caption, a link back to your site, and hashtags.
Here’s the short version:
- Install the SchedulePress plugin (free) and have an active Mastodon account ready.
- Create an application in Mastodon and copy the access token.
- Add your instance URL and token in SchedulePress to connect the profile.
- Build a template with tokens ({title}, {content}, {url}, {tags}) and keep it under 500 characters.
- Publish or schedule a post, and SchedulePress auto-posts it to Mastodon. Upgrade to PRO to post to multiple accounts at once.
Setup takes about five minutes. The full walkthrough is below.
Why Auto-Post from WordPress to Mastodon?
Mastodon rewards consistency. Posts show in order, so each one gets a fair chance to be seen. When you auto-post WordPress to Mastodon, you also add a source link back to your site. That link brings new readers to your blog.
Here is what changes when you switch from manual work to auto social sharing.
| Task | Doing it manually | With SchedulePress |
| Writing the caption | Retyped for every post | Built once from a template |
| Adding the link and tags | Copied and pasted by hand | Inserted automatically with tokens |
| Timing the post | You must be online | Posted on publish or on schedule |
| Reaching more than one account | One account at a time | Multiple accounts at once with PRO |
| Chance of forgetting | High | None, it runs on its own |
If you want to automate other networks too (e.g., Facebook, LinkedIn, X, Pinterest, Threads & more), start with our guide on how to automate social media sharing in WordPress.
What You Need Before You Start the Autopilot
You only need two things to publish WordPress posts to Mastodon with SchedulePress.
First, you need the SchedulePress plugin. Grab the free version from the WordPress.org plugin page. Mastodon works with both the free and the pro plans.
Second, you need an active Mastodon account. If you do not have one, pick a server and sign up on Mastodon.
The table below shows what each plan gives you for Mastodon.
| Feature | SchedulePress Free | SchedulePress PRO |
| Connect a Mastodon profile | Yes, one profile | Yes, unlimited profiles |
| Auto-post on publish | Yes | Yes |
| Instant post (Share Now) | Yes | Yes |
| Post to multiple Mastodon accounts | No | Yes |
| Custom social templates | Yes | Yes |
Want more than one profile? See the full comparison on the Free vs PRO page. To unlock unlimited accounts, follow the steps to install SchedulePress PRO.
Meet SchedulePress: Your Content Scheduling and Auto-Sharing Companion
Before we get to the setup, it helps to know what SchedulePress actually is and why so many bloggers rely on it.
SchedulePress is a WordPress scheduling and auto-sharing plugin. At its core, it does two jobs. It gives you precise control over when your posts go live, and it pushes those posts out to your social networks automatically. Mastodon is one of many networks it supports, so the same tool you use to auto-post to Mastodon can also handle Bluesky, Facebook, LinkedIn, X, Pinterest, Threads, and more.
Think of it as the bridge between writing and distribution. You focus on the words. SchedulePress handles the timing and the sharing.
What SchedulePress Does for Bloggers
Writing a post is only half the work. The other half is making sure people actually see it. That second half is where most bloggers lose time and momentum.
SchedulePress takes that burden off your plate. Once you set it up, your workflow shrinks to a single step: hit publish. Everything that used to come after- the caption, the link, the hashtags, the timing- happens on its own.
Here is what that looks like in practice:
- You save hours every week. No more copying titles, pasting links, or rewriting captions for each network. You set a template once and reuse it forever.
- You never forget to share. Manual posting depends on memory and free time. Automation does not. Every published post reaches Mastodon, even on your busiest days.
- You stay consistent. Consistency is what builds an audience. SchedulePress keeps your posting rhythm steady, whether you publish once a week or five times a day.
- You keep control. Automation does not mean losing your voice. You decide the wording, the tags, the source link, and the schedule. The plugin just carries out your plan.
How It Helps You Promote Content on Mastodon
Mastodon works differently from most social platforms, and that difference plays to your advantage.
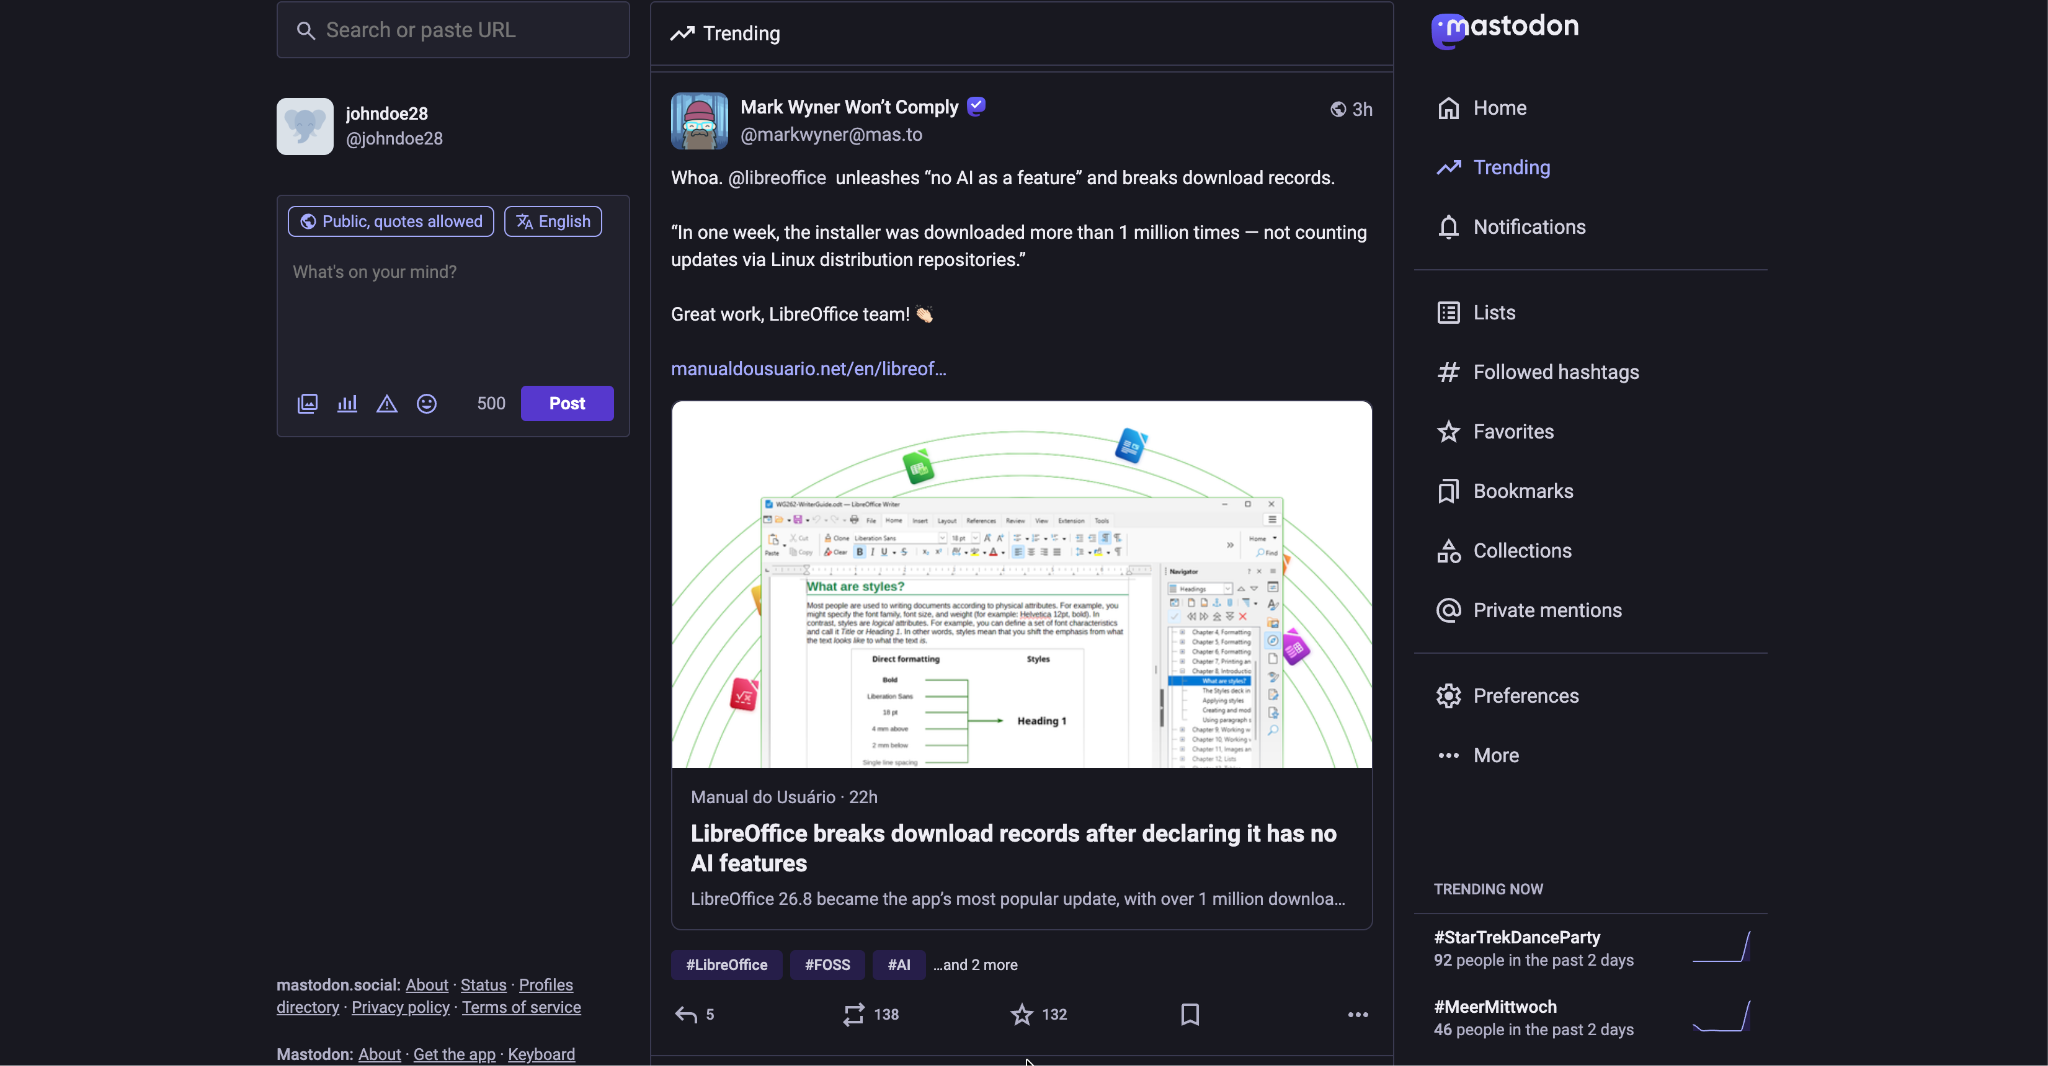
There is no algorithm deciding who sees your post. The timeline is chronological, so every post gets a fair shot in front of your followers. But that fairness comes with a catch. If you are not posting consistently, you simply are not visible. Presence on Mastodon is earned by showing up.
SchedulePress helps you show up without the effort. The moment your blog post goes live, a well-formatted toot lands on your timeline, complete with a caption, relevant hashtags, and a link back to your site. That link matters. It turns Mastodon followers into blog readers and sends real traffic back to content you own.
Hashtags matter even more on Mastodon than on other networks, because they are the main way people discover new content. SchedulePress lets you pull your post tags in automatically with a token, so every toot is discoverable from the start. You do not have to remember to add them. They are just there.
And because Mastodon caps each post at 500 characters, SchedulePress gives you a live character counter and a live preview. You see exactly how your toot will look before it goes out. No guesswork, no truncated links, no surprises.
Why Bloggers Choose Automation Over Manual Posting
Manual cross-posting feels manageable at first. One post, a few minutes, no big deal. But it does not scale. As your blog grows, the small task repeated across every post and every platform quietly eats your week.
Automation flips that math. The setup cost is a few minutes, once. After that, the cost per post is zero. You get the reach of consistent social sharing without the recurring chore.
That is the real value of SchedulePress for a busy blogger. It protects the thing you have least of, which is time, while making sure the content you worked hard on does not slip through the cracks.
Now that you know what SchedulePress brings to the table, let us get it connected to Mastodon.
How to Automatically Post WordPress to Mastodon with SchedulePress
The setup takes only a few minutes. Follow these six steps in order.
Step 1: Create an Application in Mastodon
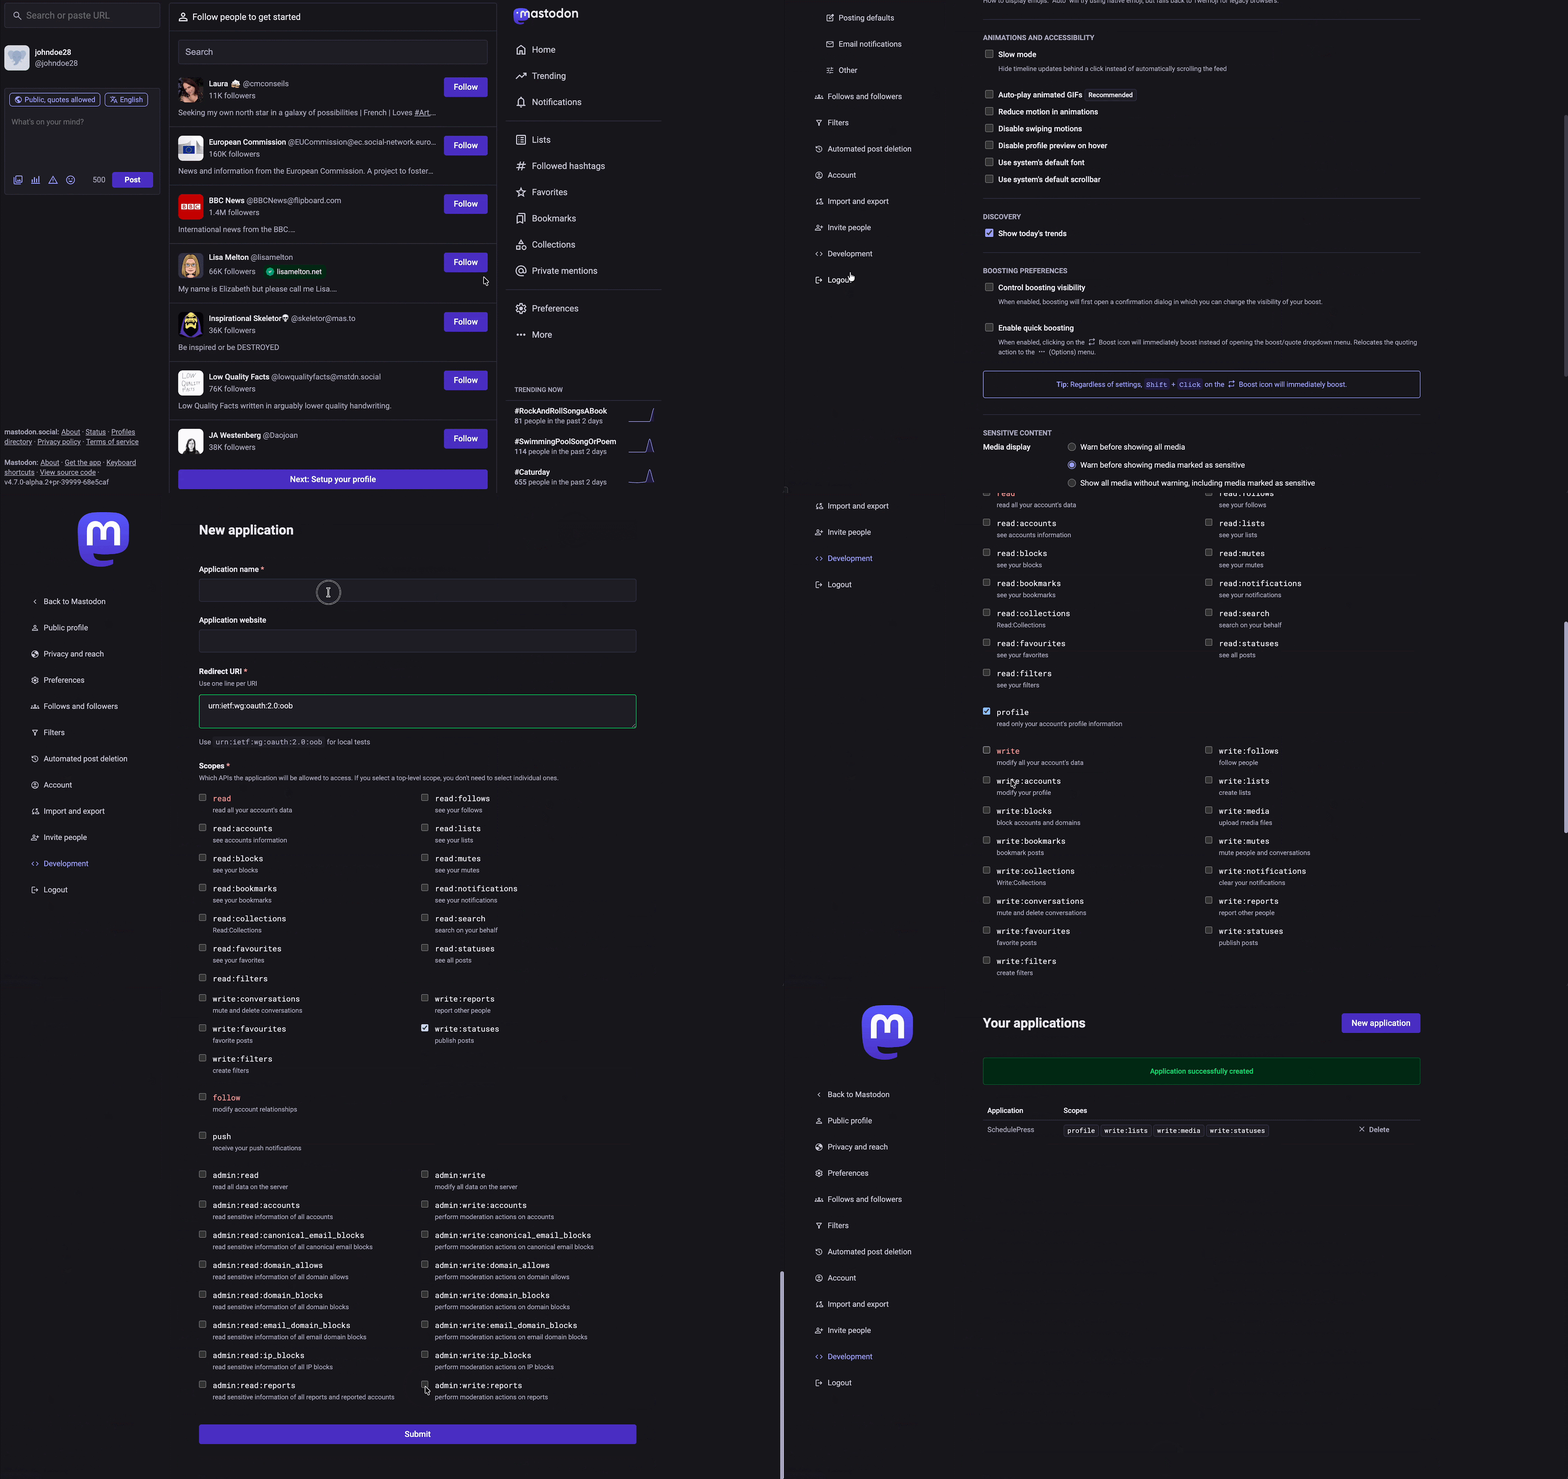
Log in to your Mastodon account. Go to Preferences, then Development. Click New application. Give it a clear name, such as SchedulePress. Then confirm.
While creating it, set the correct scopes. Scopes tell Mastodon what your app is allowed to do.
| Scope | What it allows |
| profile | Read your basic profile details |
| write:lists | Manage your lists |
| write:media | Upload your featured image and media |
| write:statuses | Post the actual status to your timeline |
After you save, open the application. Copy the Access Token. You will need this token in Step 3.
Step 2: Turn On Mastodon Inside SchedulePress
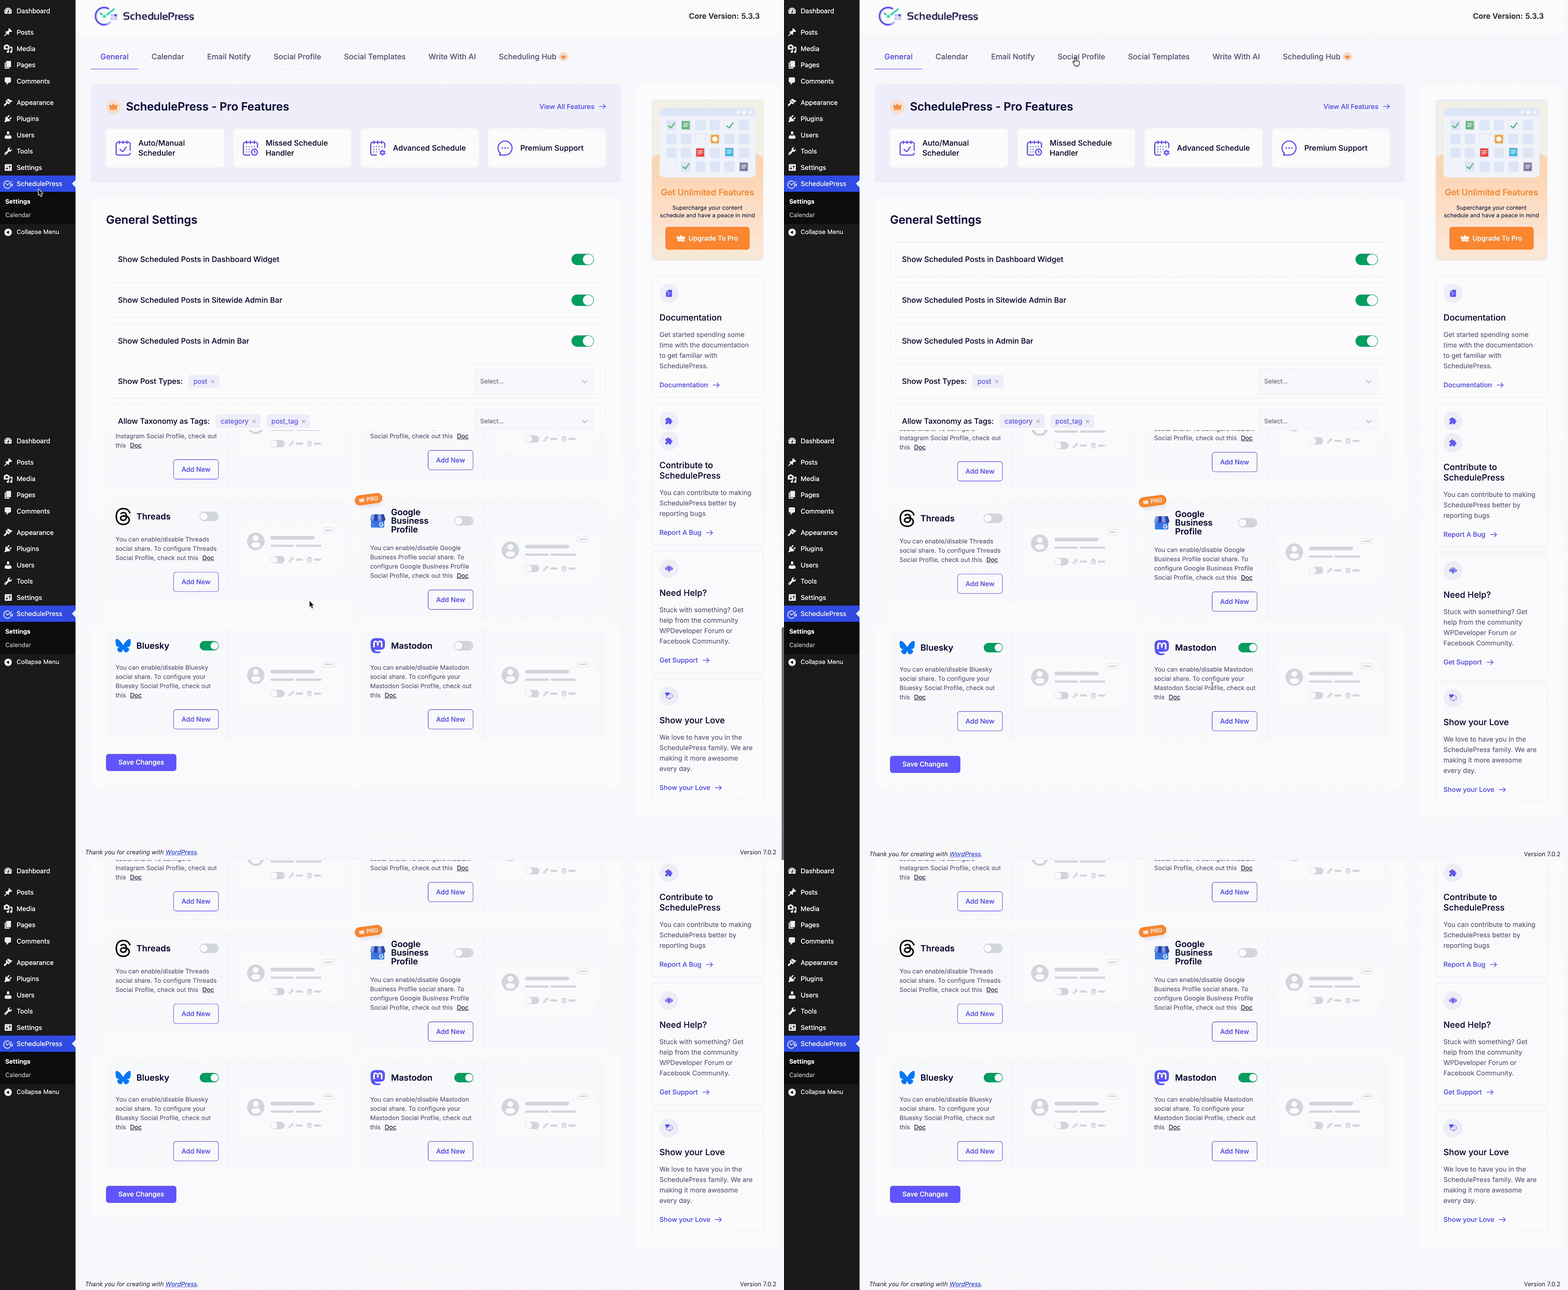
Open your WordPress dashboard. Go to SchedulePress, then Settings. Open the Social Profile tab. Scroll down to the Mastodon option.
Toggle the Mastodon network on. Then click Add New. A pop-up window will open.
Step 3: Connect Your Mastodon Account
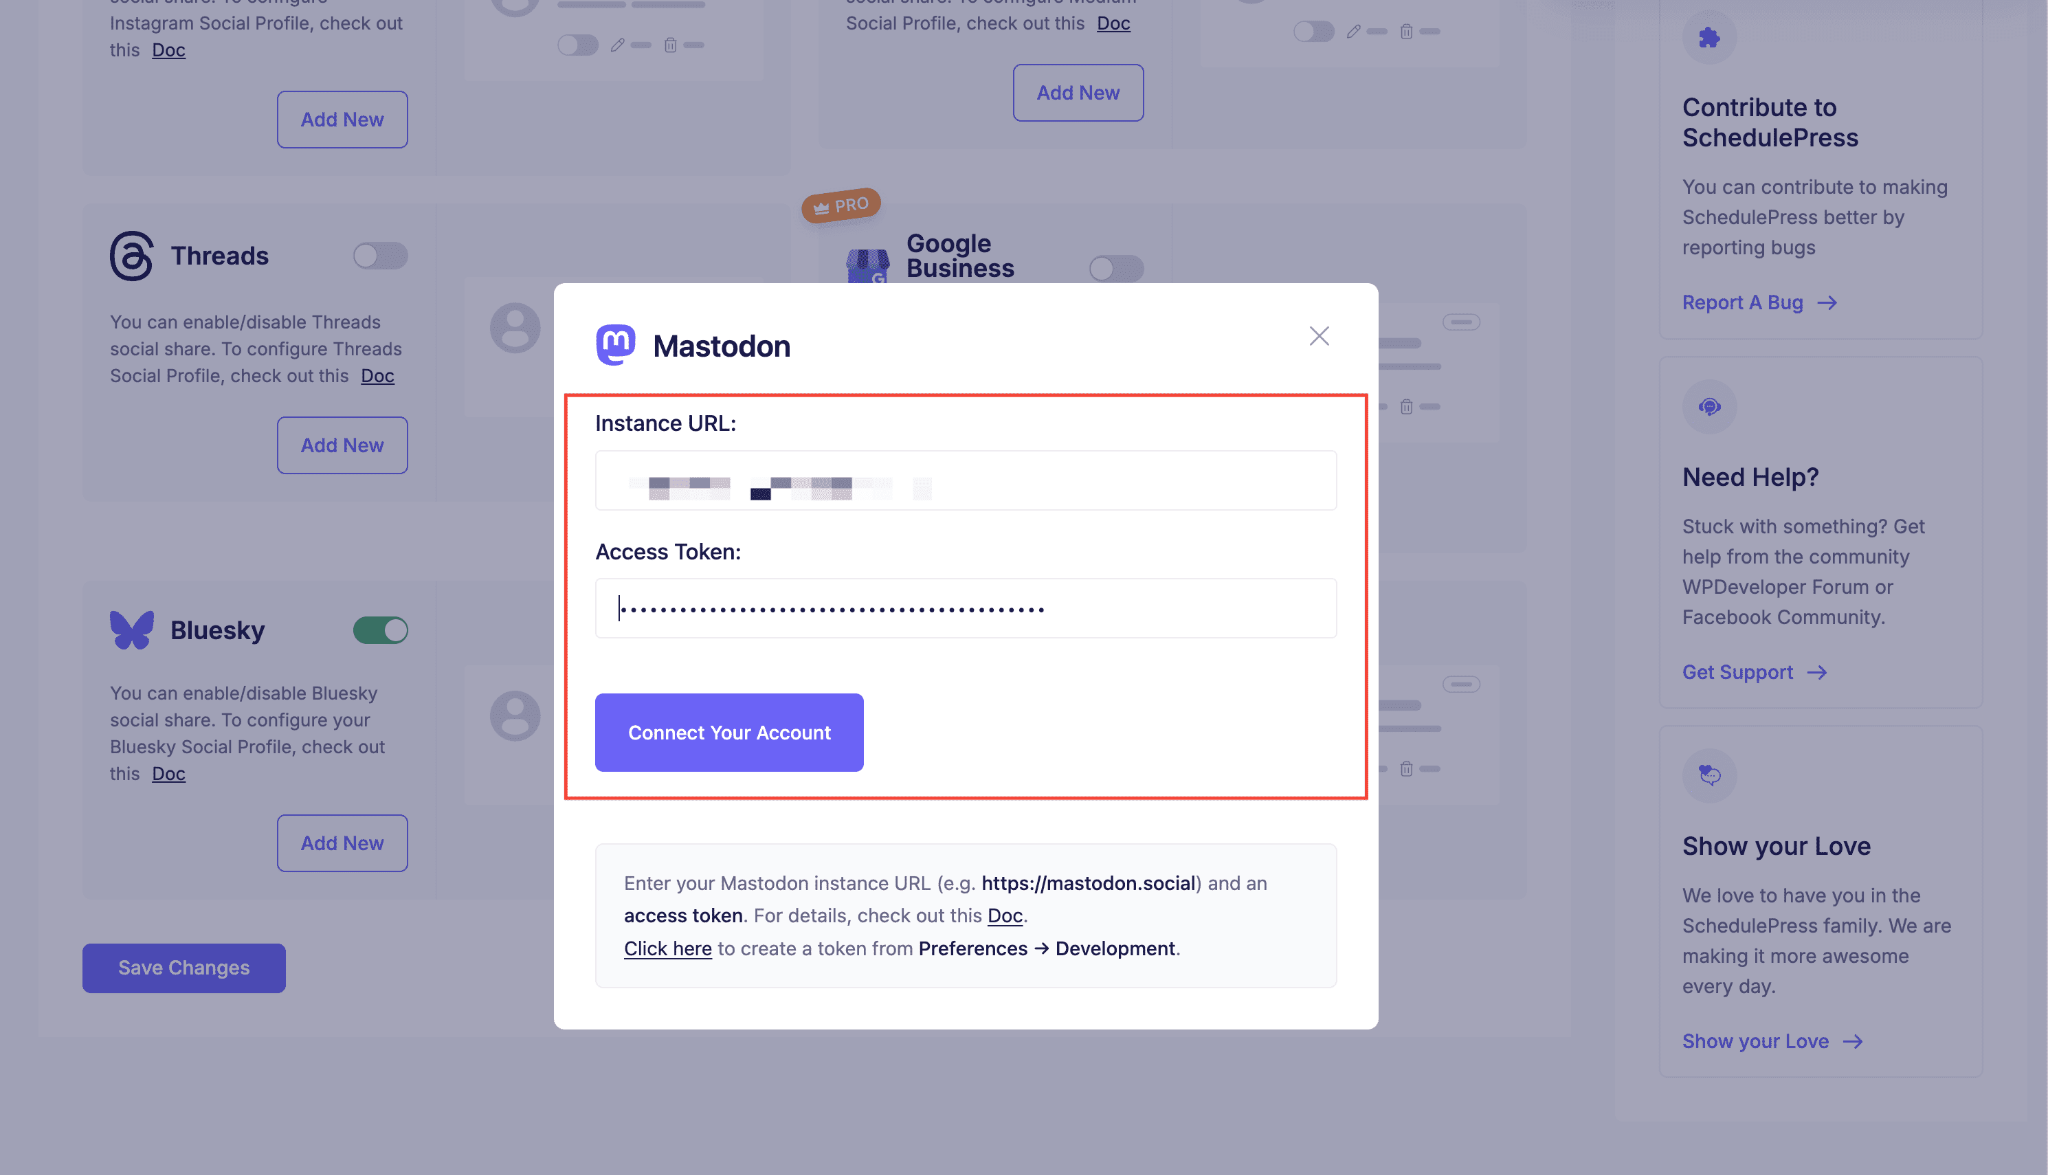
The connect window has two fields. In the Instance URL field, add your Mastodon instance address (e.g., @alice@mastodon.social). In the Access Token field, paste the token you copied earlier.
Then click Connect Your Account. If you have not made an application yet, use the Click here link in the same window. It takes you straight to the setup.
Step 4: Enable the Profile and Save
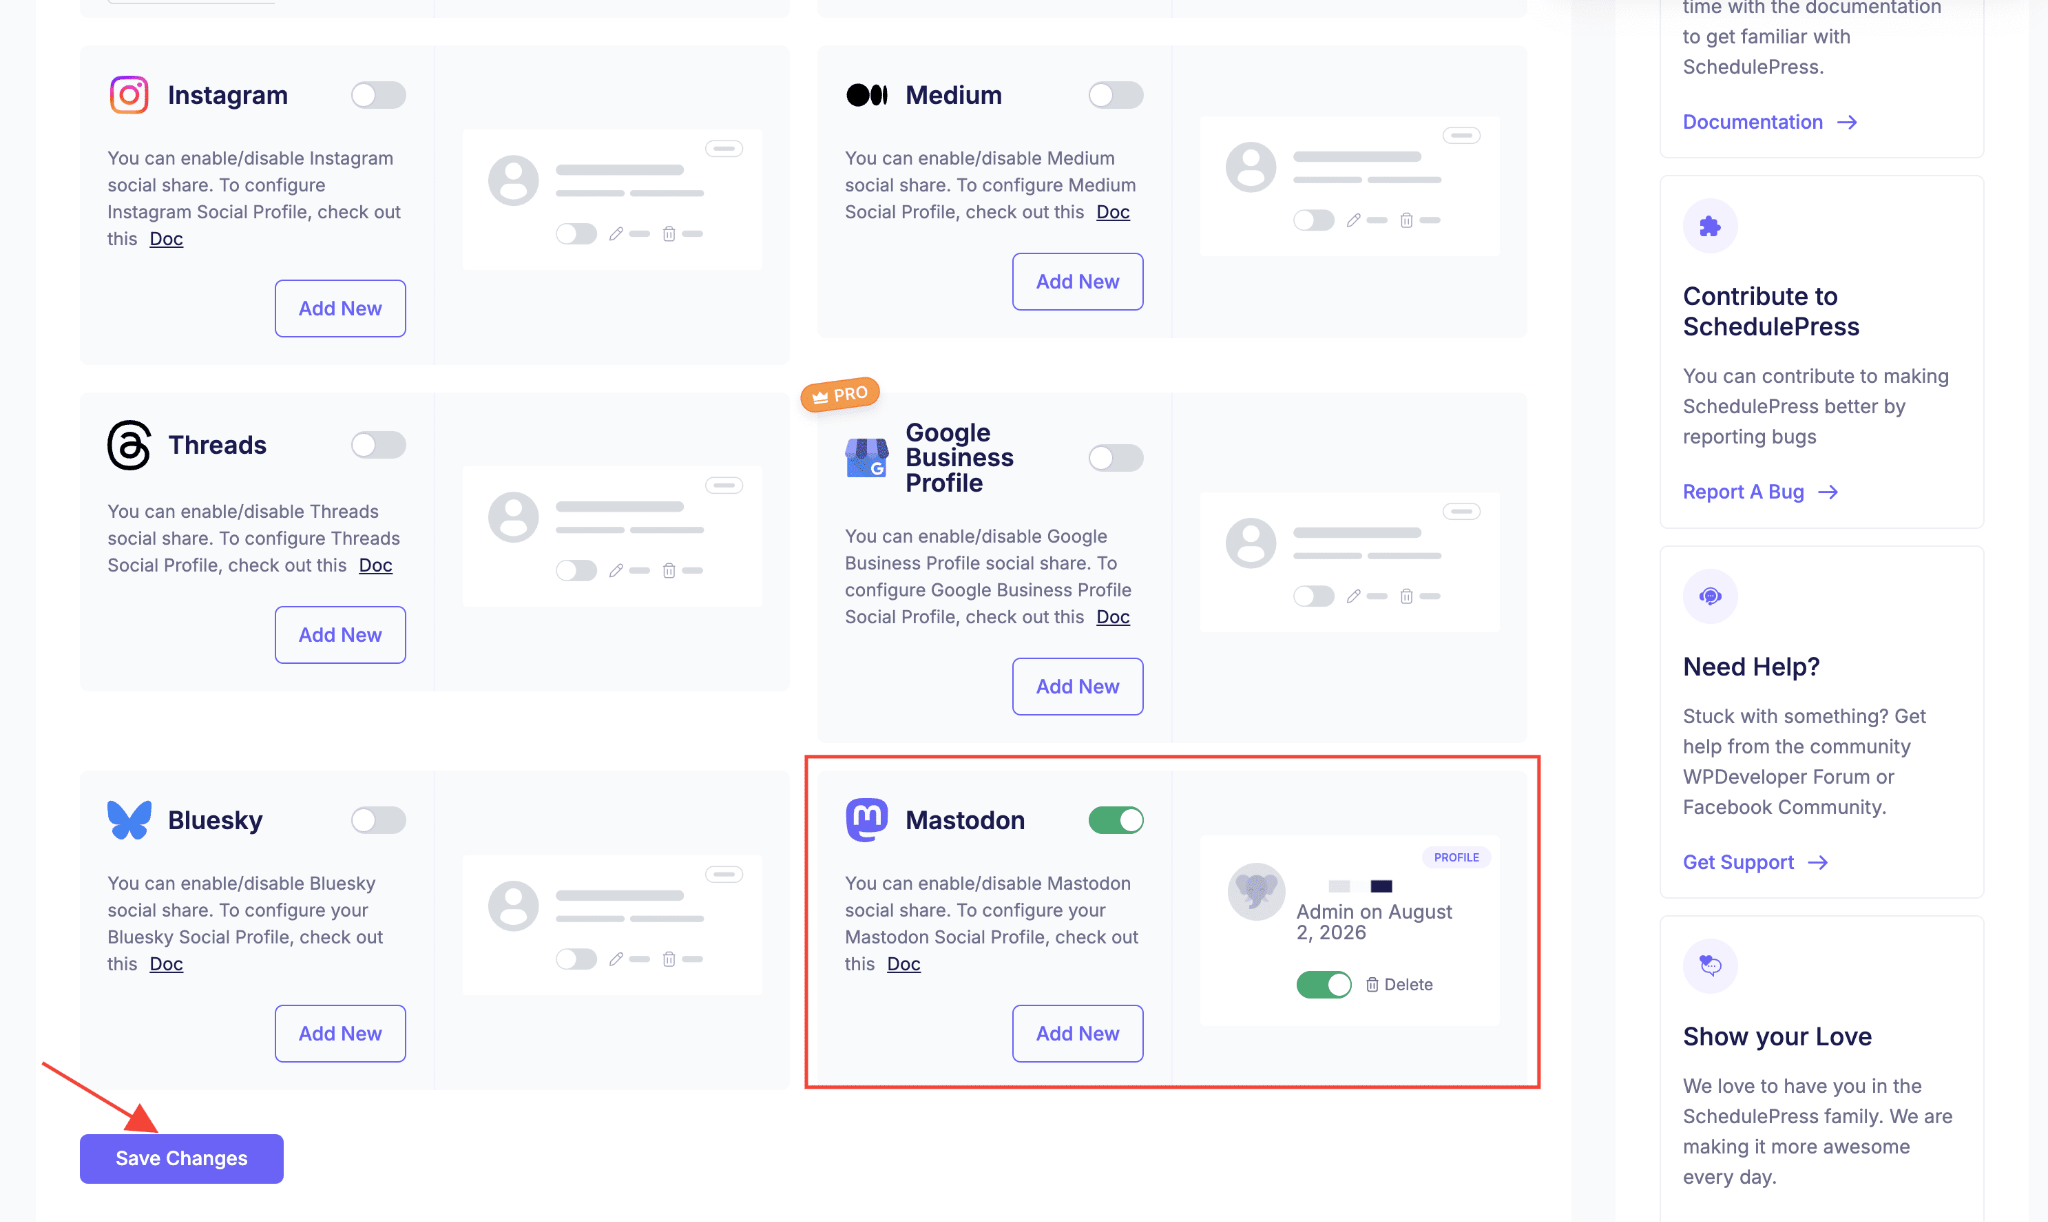
Your account will connect in a few moments. It will show as a card next to the Mastodon option, tagged as a profile.
Now switch on two toggles. Turn on the network toggle on the Mastodon card. Turn on the profile toggle on your account. Then click Save Changes. Repeat these steps to connect multiple Mastodon accounts.
Step 5: Customize Your Mastodon Template
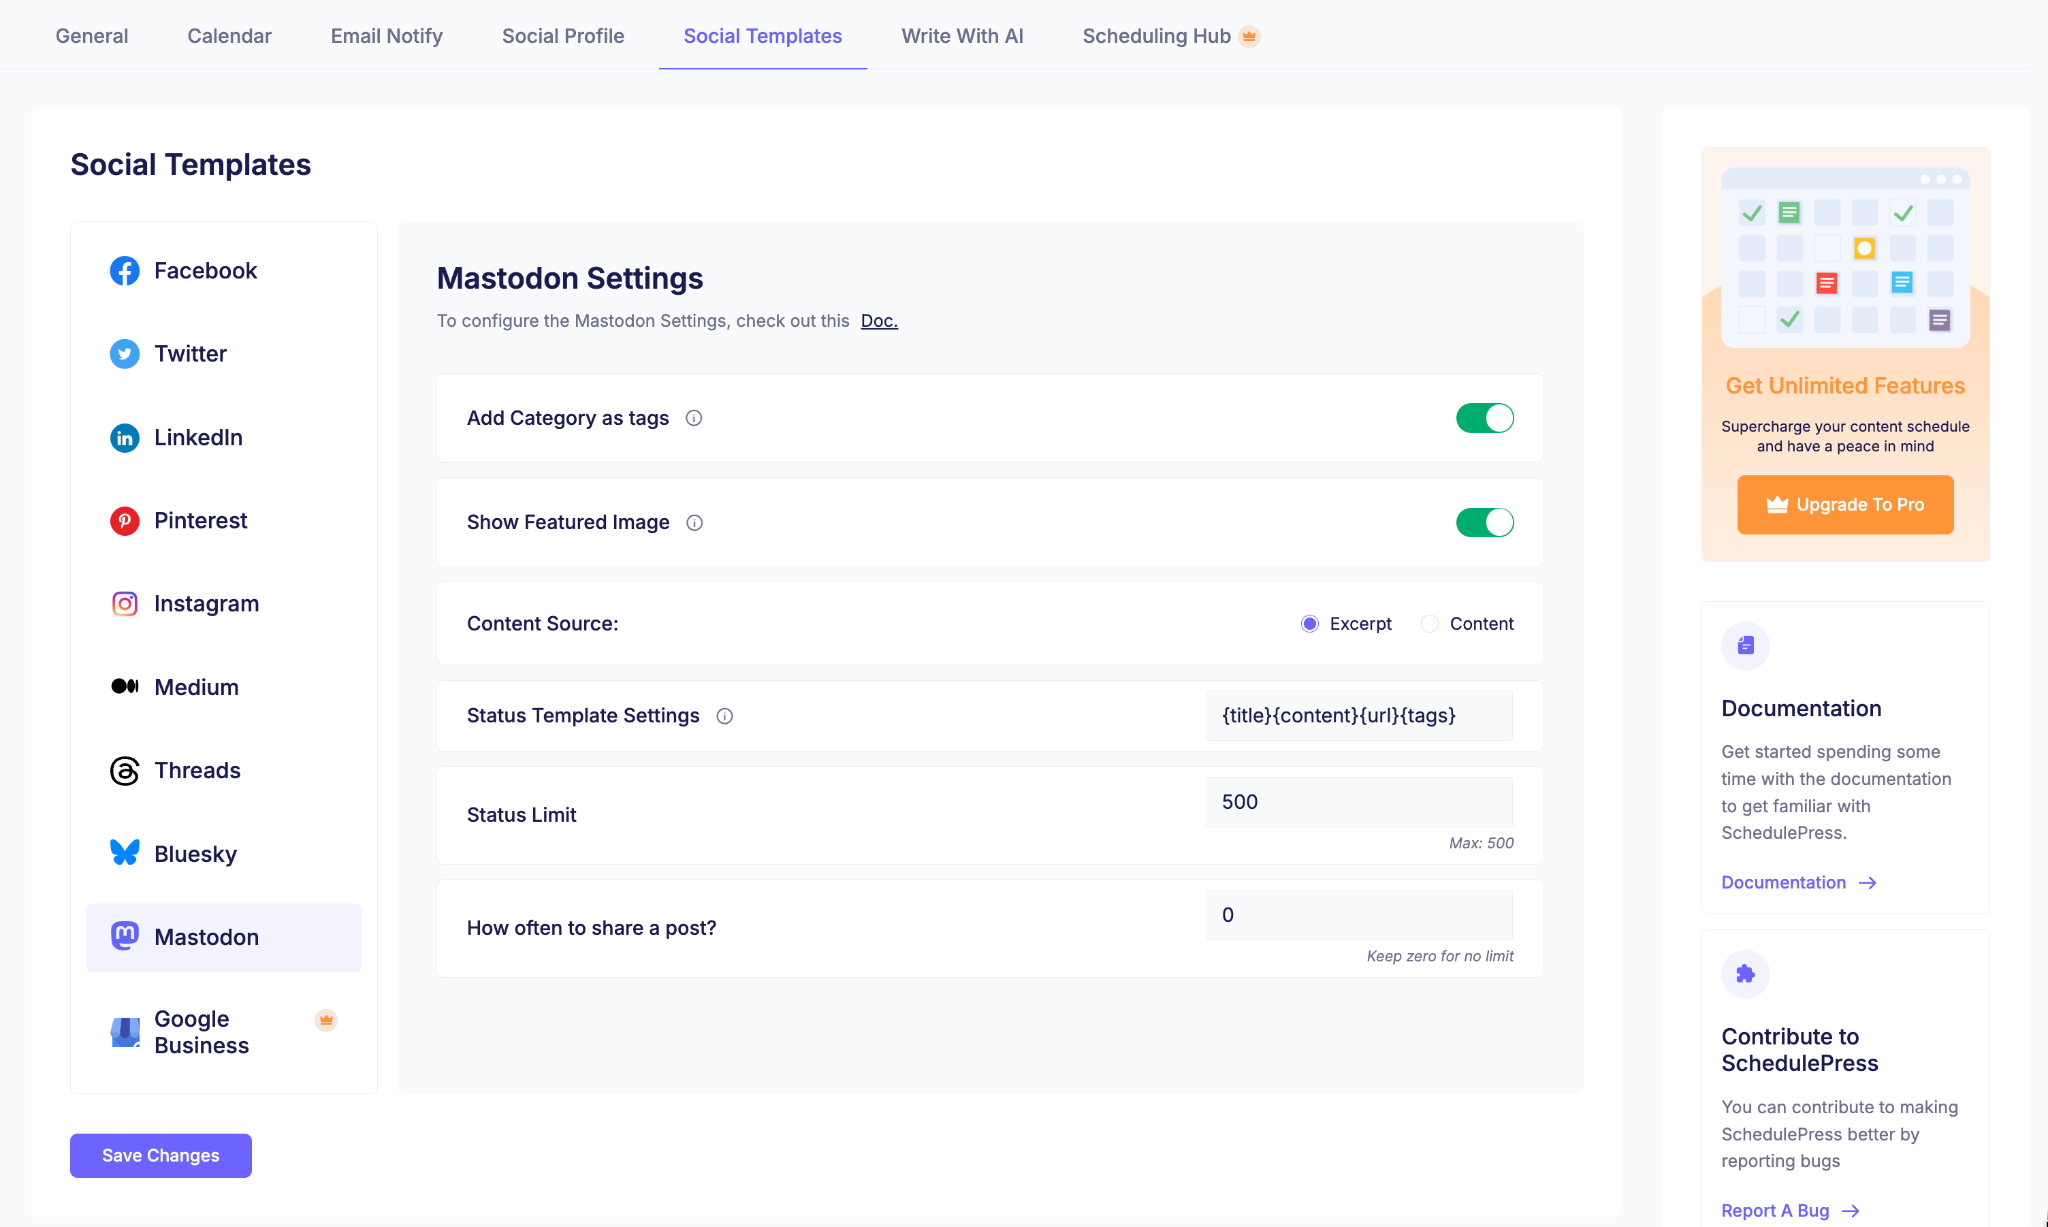
Open the Social Templates menu. Here you set how each post looks on Mastodon. You can add categories as tags, set a content source, and set how often to post.
You control the text with simple tokens. Each token pulls in a piece of your post.
| Token | What it inserts |
| {title} | Your post title |
| {content} | A snippet of your post content |
| {url} | The link back to your post |
| {tags} | Your post tags as hashtags |
Keep your template short. Mastodon allows only 500 characters per post.
Step 6: Publish and Auto-Post
Now you are ready. Schedule a WordPress post as usual. When it goes live, SchedulePress will post it to Mastodon for you.
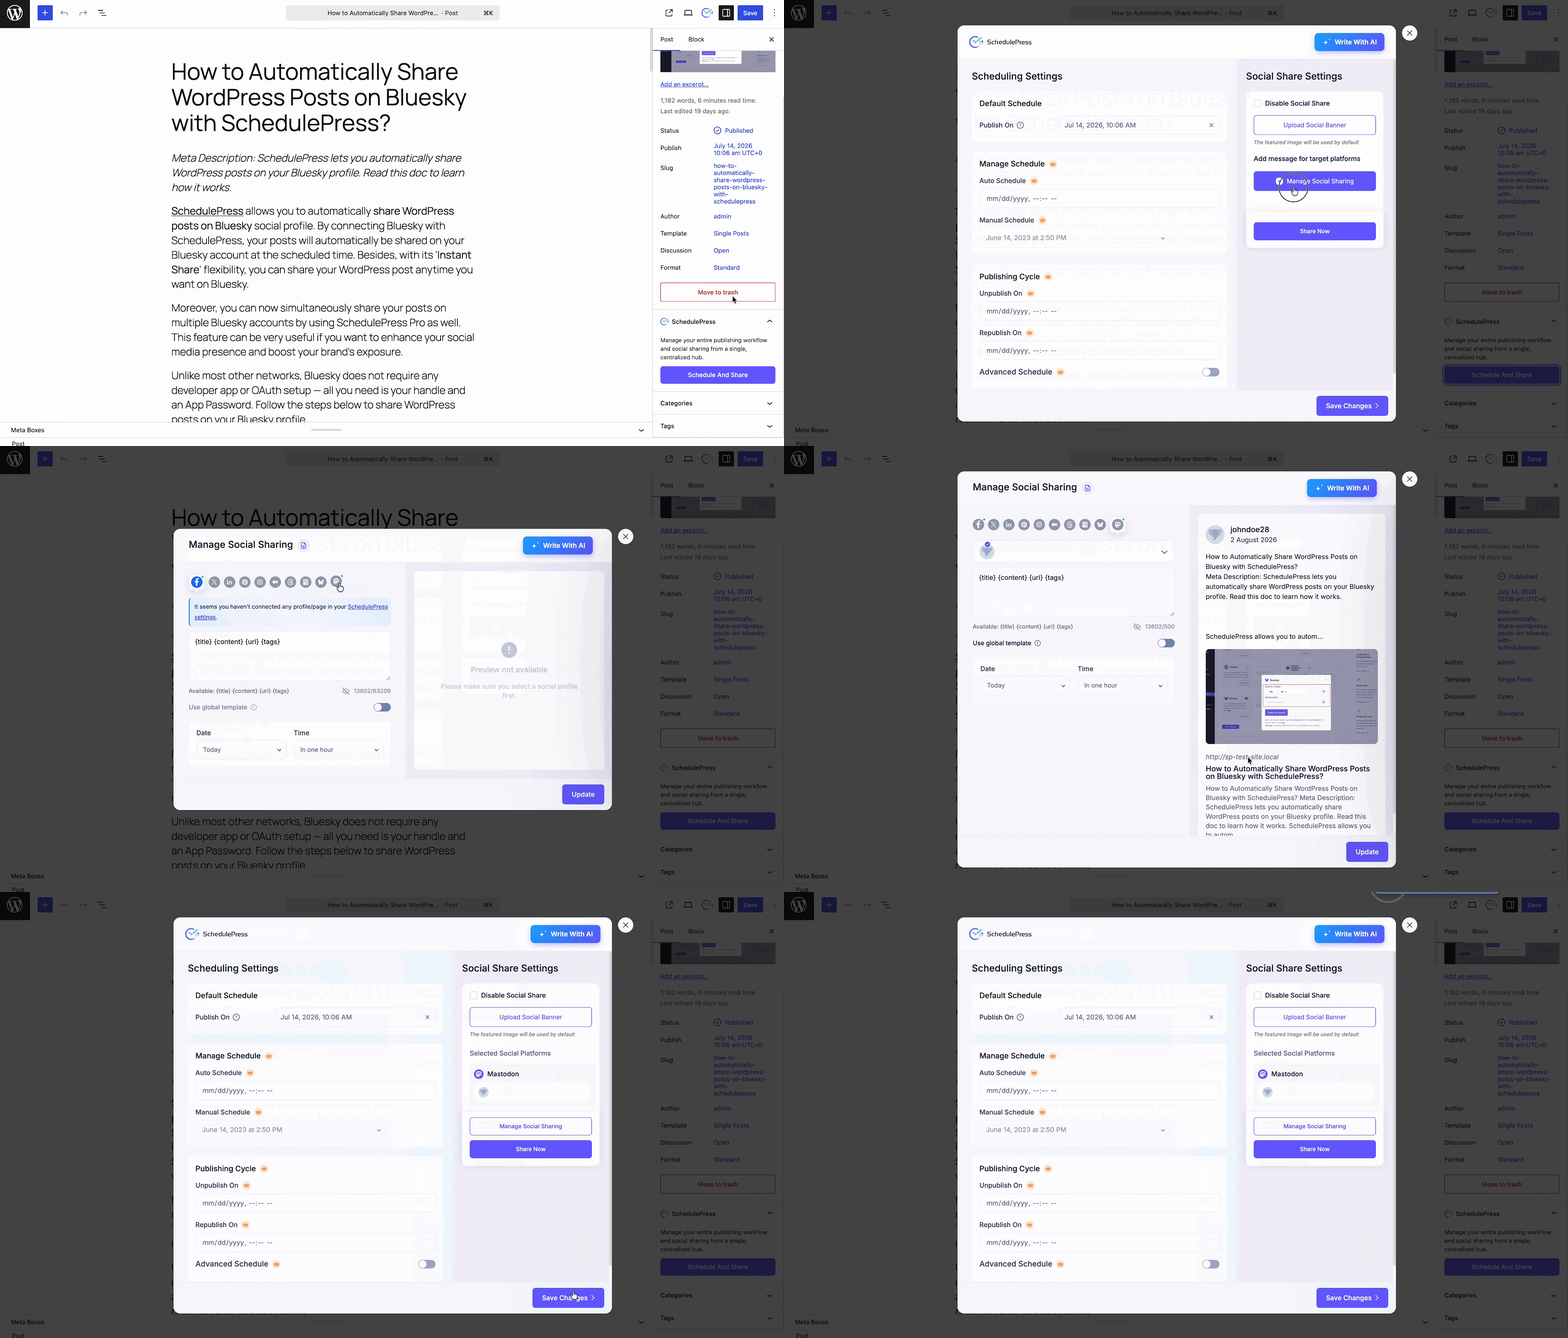
Want to send it right away? Open the post editor. Expand the SchedulePress panel, then Schedule And Share. Under Selected Social Platforms, choose Mastodon and your profile. Click Share Now to post at once.
You can also click Manage Social Sharing and open the Mastodon tab. A live 500-character counter shows your remaining space. A live preview shows how the post will look before it goes out.
Scheduled Post vs Instant Post
SchedulePress gives you two ways to reach Mastodon. Both use the same connected profile.
| Method | When it posts | Best for |
| Auto-post on publish | The moment your post goes live | Hands-off, everyday posting |
| Instant post (Share Now) | Right now, on demand | Older posts and quick promos |
Scheduled posting pairs well with a content plan. To plan ahead, read our guide on how to schedule WordPress posts.
Tips for Better Mastodon Posts
A few small habits help your posts land better. Keep them in mind as you build your template.
- Keep captions under 500 characters, since Mastodon is strict about the limit.
- Use the {tags} token for hashtags, because hashtags drive discovery on Mastodon.
- Always keep the {url} token so readers can click back to your site.
- Add a featured image when you can, because visual posts stand out on the timeline.
For a deeper plan, see our post on social media marketing automation for WordPress.
Post to Multiple Mastodon Accounts
Run more than one brand or community? SchedulePress PRO lets you connect several Mastodon profiles. Then you can cross-post one WordPress article to all of them at the same time. This is a fast way to grow your reach across the federated social network.
You are not limited to Mastodon either. SchedulePress works as a full Mastodon auto poster for WordPress and much more. You can also auto-post to Bluesky and other networks.
To see the full toolkit, explore our guide to social media automation tools.
Start Auto-Posting to Mastodon Today
Manual cross-posting wastes time. It also lets good content slip through the cracks. SchedulePress fixes that. You connect Mastodon once, set a template, and let it run.
Here is a quick recap of what to do next.
- Install SchedulePress from the WordPress plugin page.
- Connect your account using your Mastodon instance URL and access token.
- Set your template with tokens and keep it under 500 characters.
- Publish or schedule your post and let SchedulePress post it for you.
- Go PRO to auto-post to multiple Mastodon accounts at once.
Follow the full walkthrough in the SchedulePress Mastodon documentation. Then let your WordPress content reach Mastodon on autopilot.