
SchedulePress allows you to automatically share WordPress posts on Bluesky social profile. Besides, with its ‘Instant Share‘ flexibility, you can share your WordPress post anytime you want on Bluesky.
Moreover, you can now share your posts on multiple Bluesky accounts simultaneously with SchedulePress Pro. This feature can be very useful if you want to enhance your social media presence and boost your brand’s exposure.
Unlike most other networks, Bluesky does not require any developer app or OAuth setup — all you need is your handle and an App Password. Follow the steps below to share WordPress posts on your Bluesky profile.
Note: Bluesky is available in both the Free and PRO versions of SchedulePress. The Free version lets you connect one profile per network, while SchedulePress PRO unlocks unlimited profiles.
How to Connect Bluesky with SchedulePress #
We will now show you how to connect your Bluesky profile to SchedulePress. By following the steps below, you will be able to automatically share WordPress posts on Bluesky.
Step 1: Create an App Password from Your Bluesky Account #
Make sure you have an active profile on Bluesky. To let SchedulePress post on your behalf, you need an App Password — a limited credential that works without exposing your main Bluesky login and which you can revoke at any time.
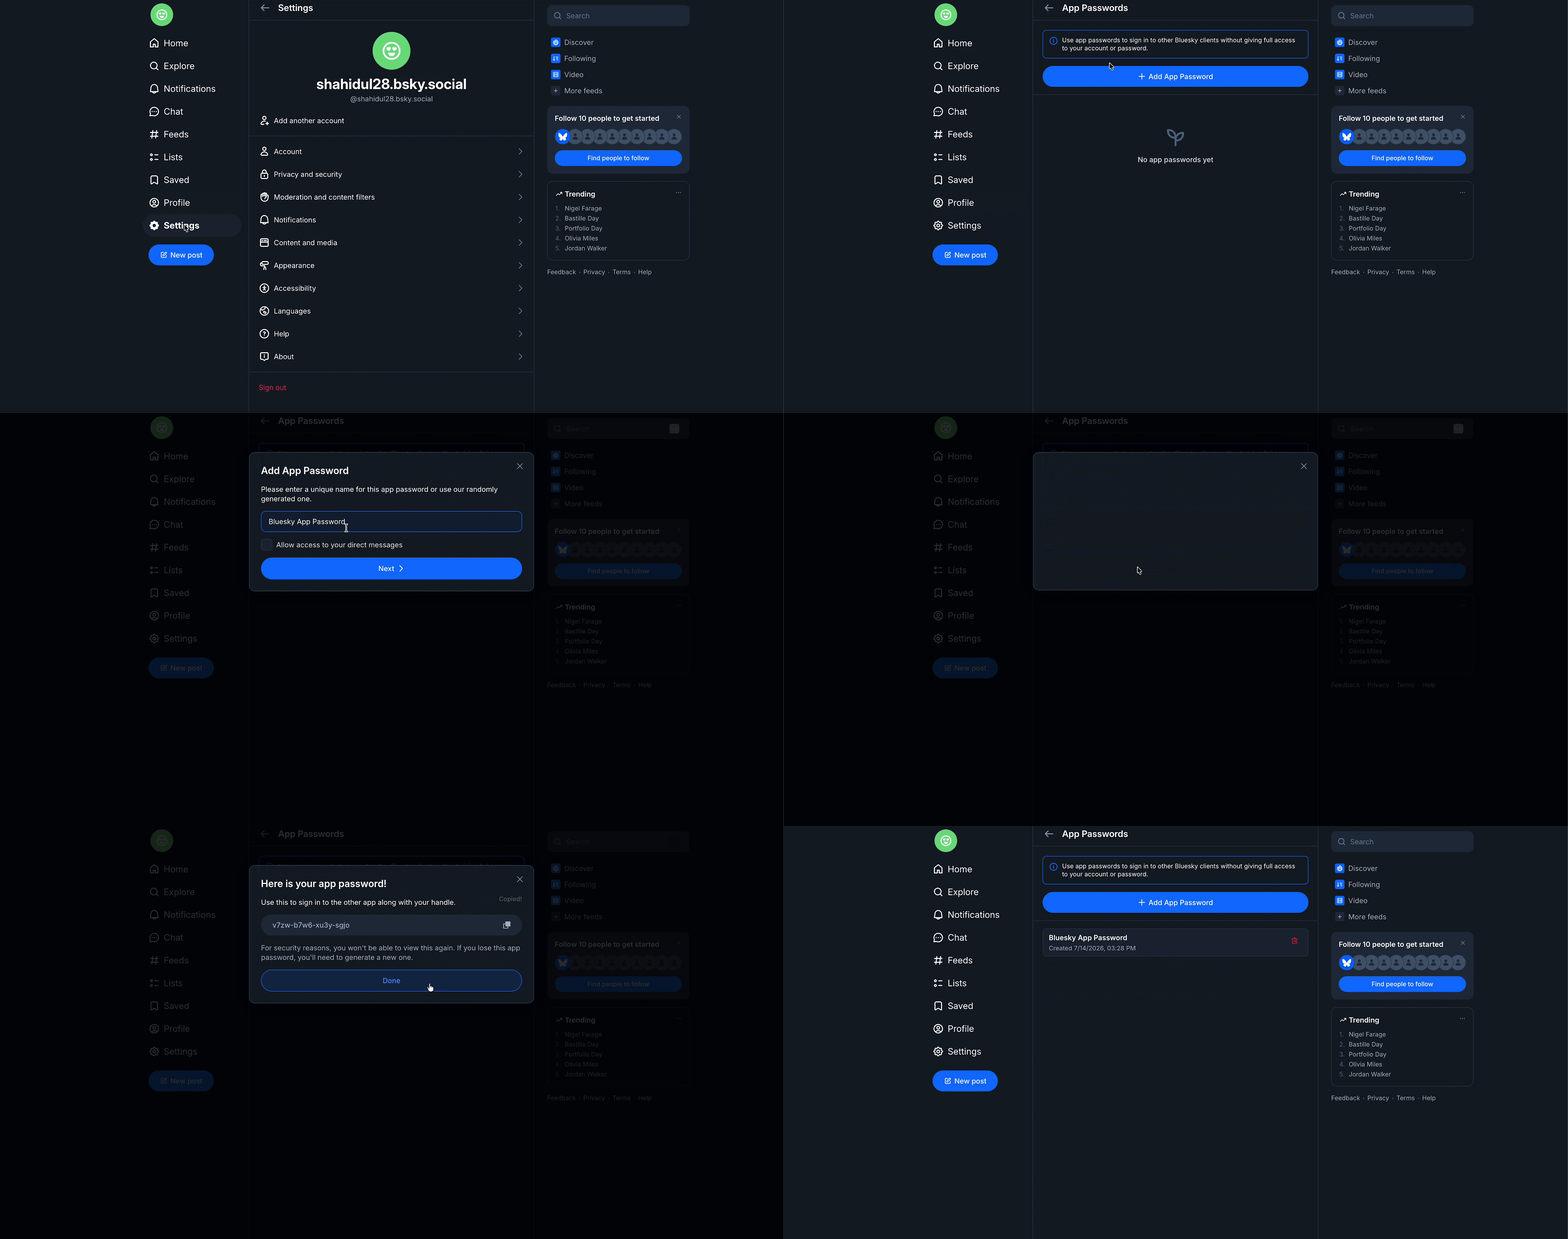
Log in to your Bluesky account and navigate to ‘Settings‘ → ‘Privacy and Security‘ → ‘App Passwords‘. Then, click on the ‘Add App Password‘ button, give it a recognizable name such as SchedulePress, and confirm.
Bluesky will now generate a password in the xxxx-xxxx-xxxx-xxxx format. Copy it right away, as it will be shown to you only once.
Step 2: Go to SchedulePress from the Navigation Panel #
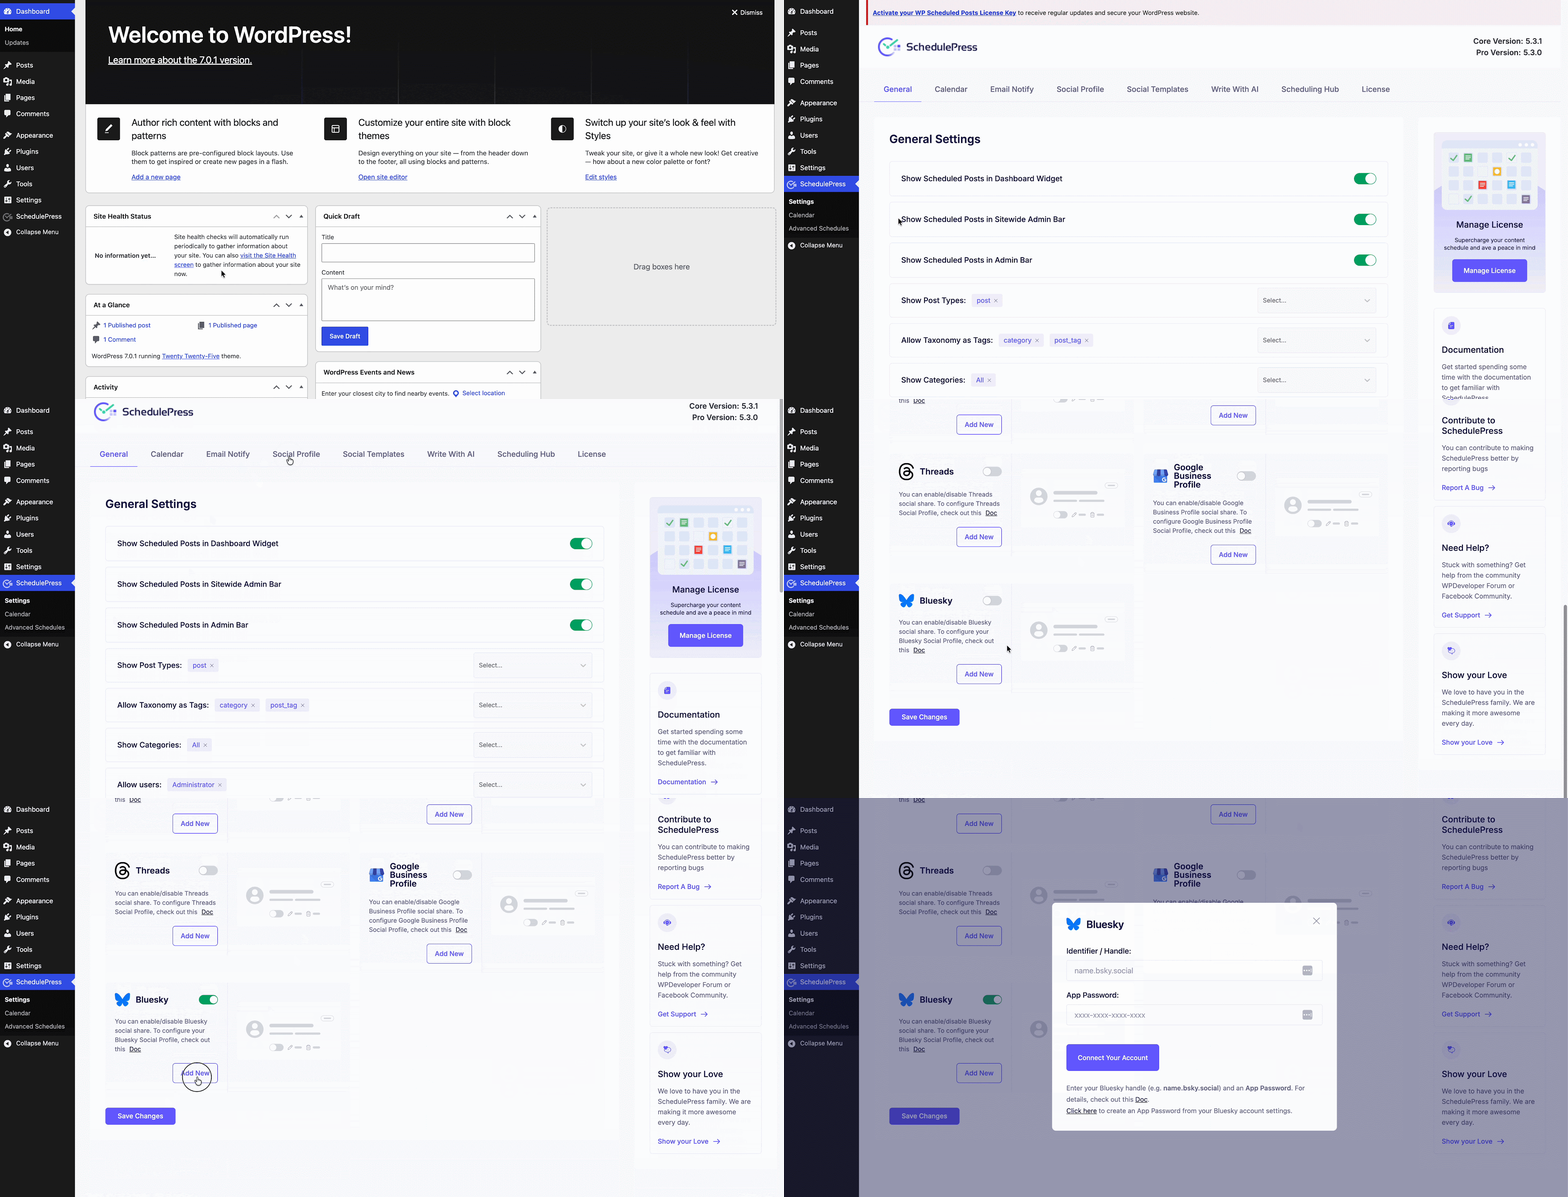
Afterward, go to your WordPress Dashboard and navigate to ‘wp-admin‘ → ‘SchedulePress‘ → ‘Settings‘. Go to the ‘Social Profile‘ tab and scroll down to find the ‘Bluesky‘ option.
Toggle to enable the ‘Bluesky‘ network, then hit the ‘Add New‘ button. It will open a pop-up window where you can connect your account.
Step 3: Connect Your Bluesky Account with SchedulePress #
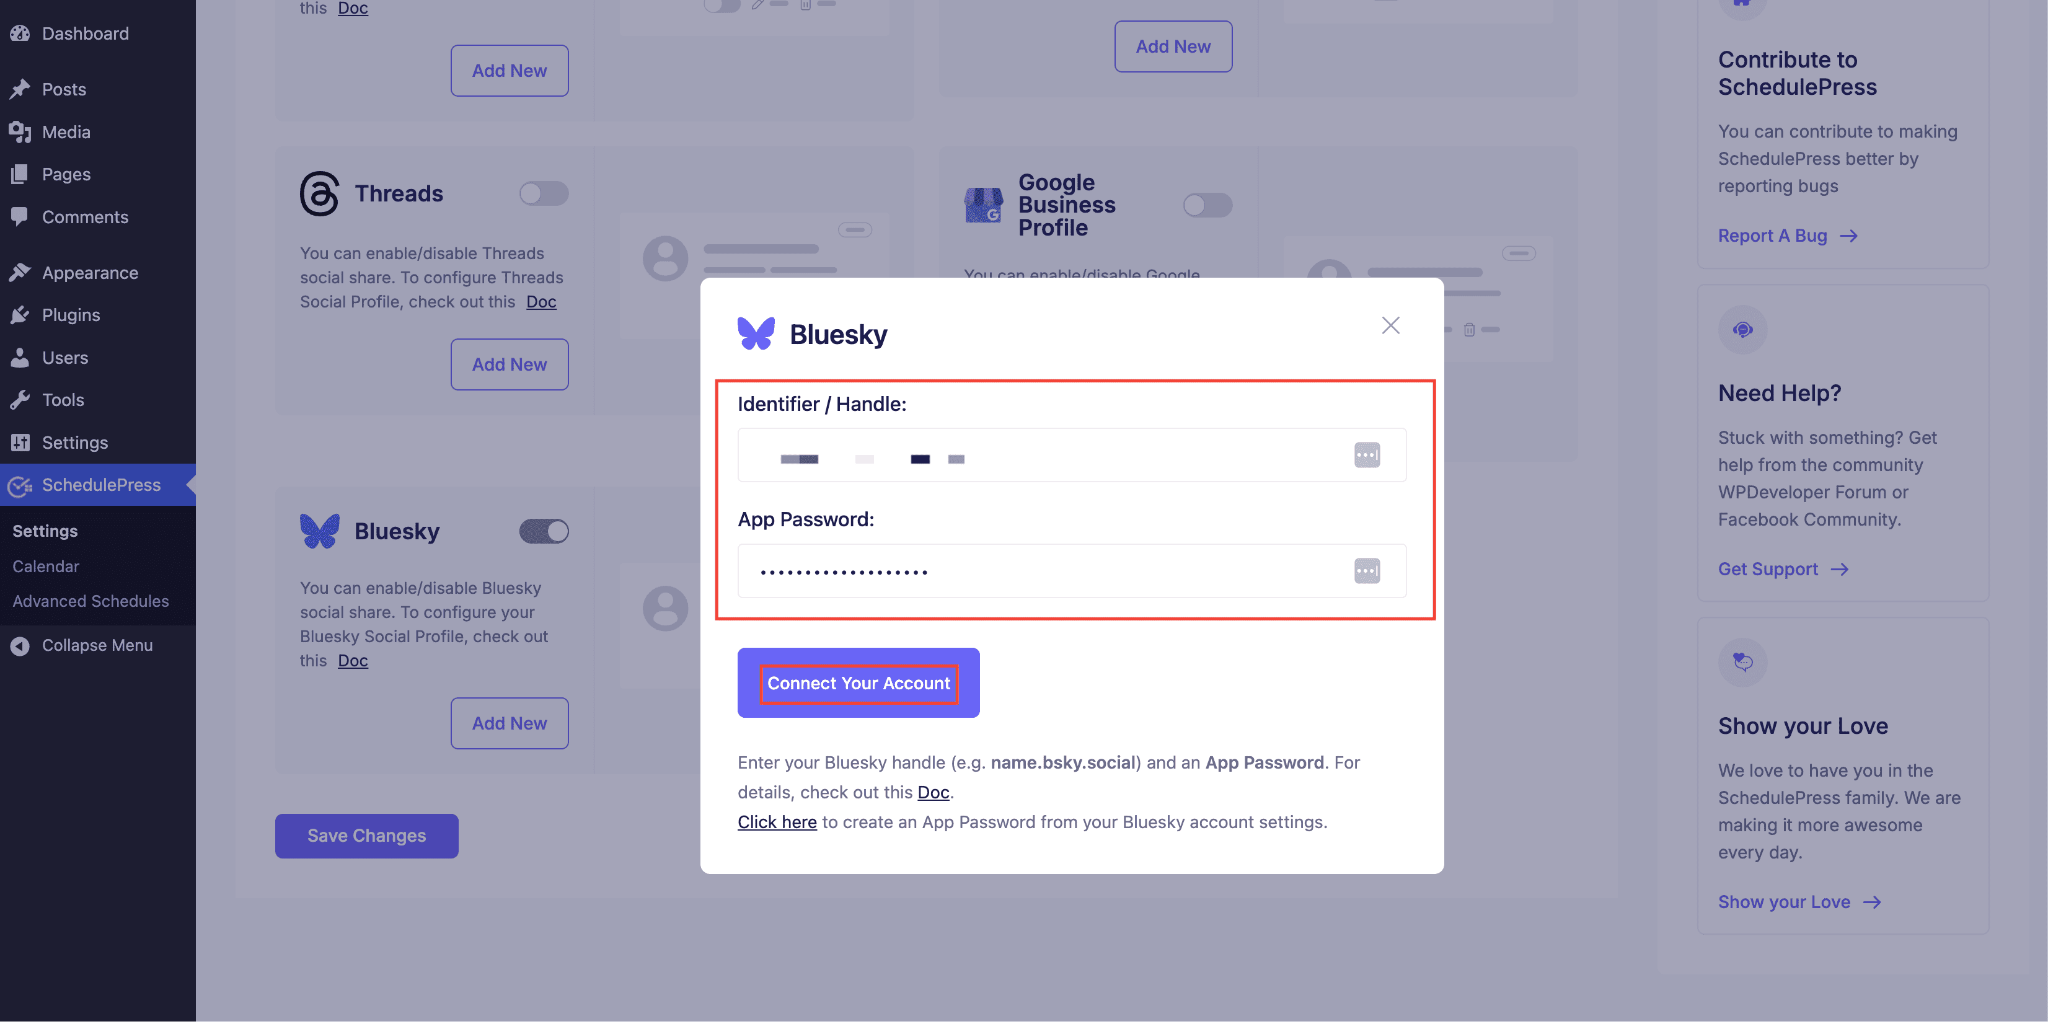
In the Bluesky connect window, you will find two fields. In the ‘Identifier / Handle‘ field, insert your full Bluesky handle, for example, name.bsky.social. Then, paste the App Password you copied earlier into the ‘App Password‘ field.
Once both fields are filled in properly, click on the ‘Connect Your Account‘ button. If you have not created an App Password yet, simply use the ‘Click here‘ link in the same window — it will take you straight to the Bluesky App Passwords page.
Step 4: Enable the Profile & Save Your Changes #
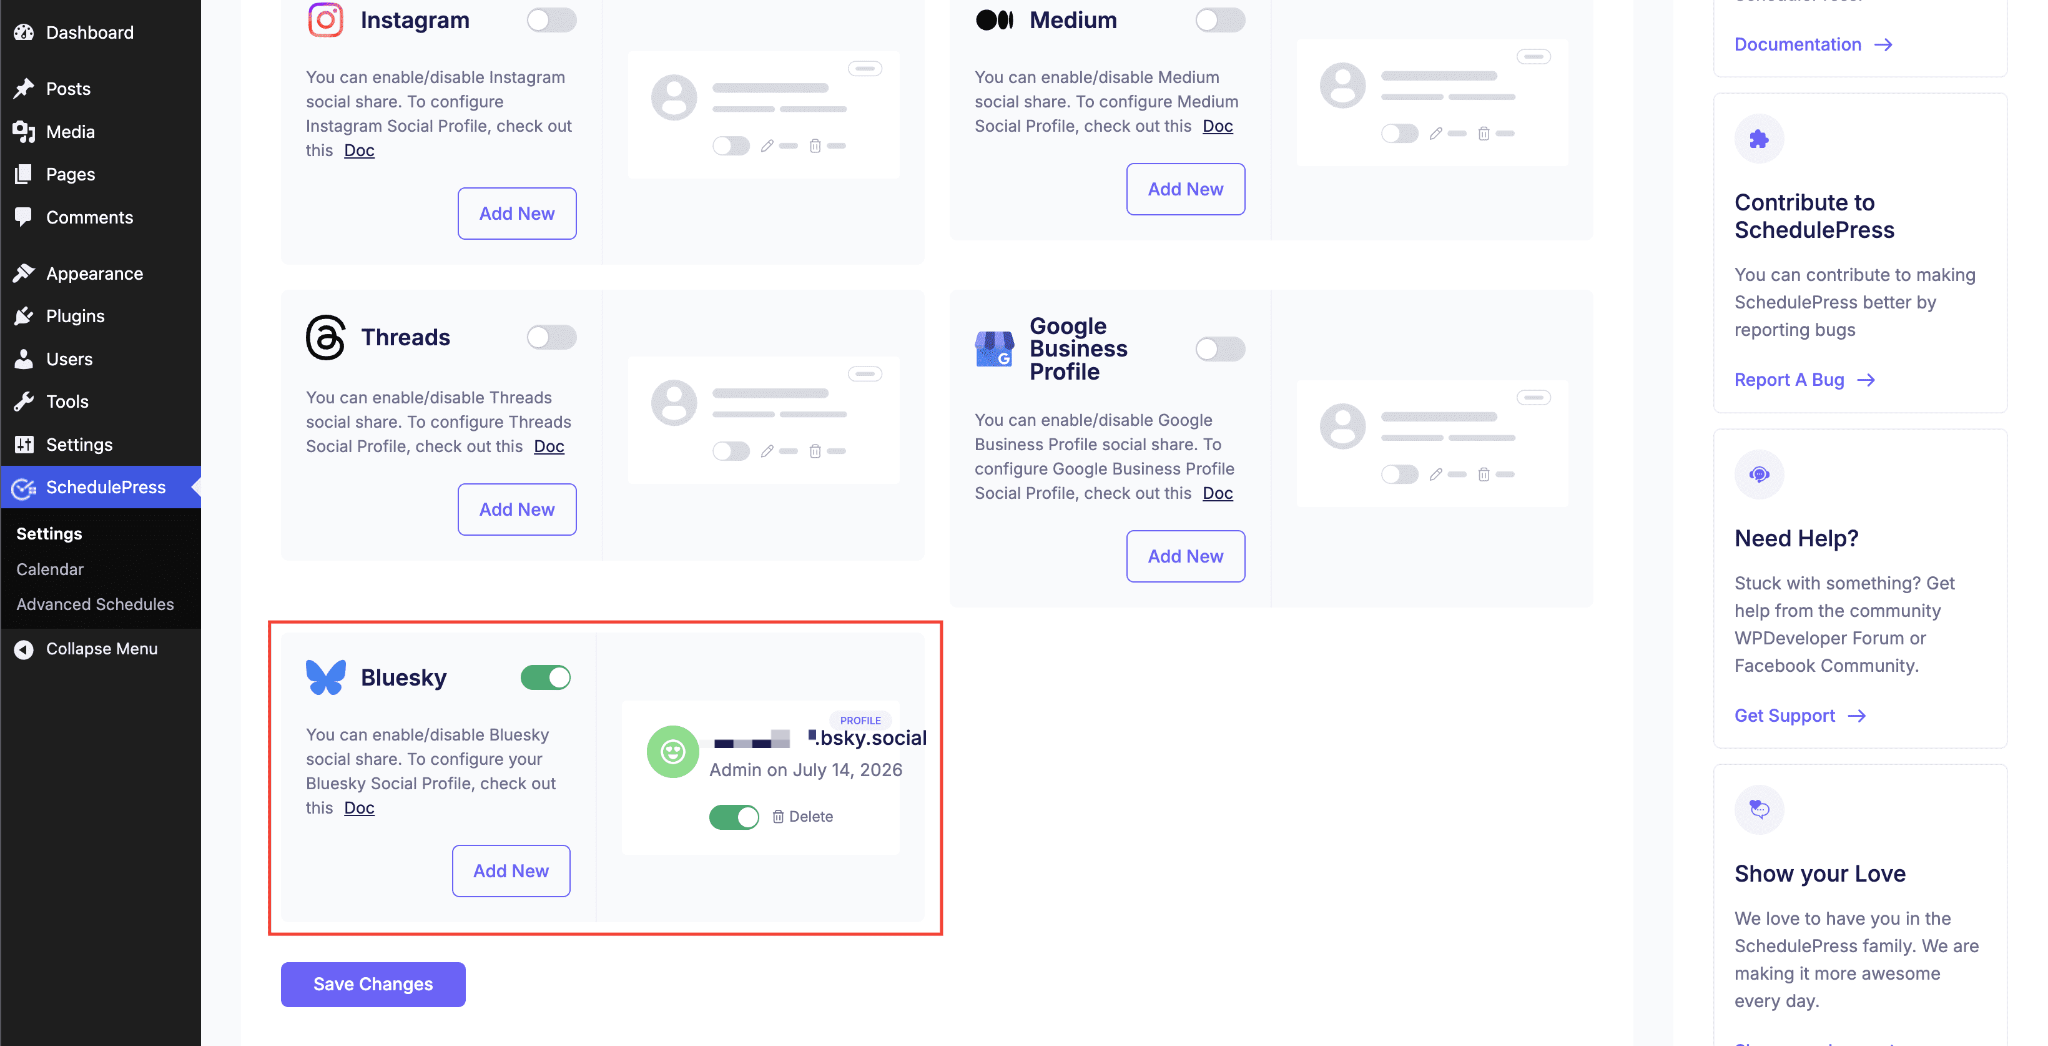
After a few moments, you will be successfully connected to your Bluesky profile. Your connected account will be visible as a card next to the ‘Bluesky‘ option in the ‘Social Profile‘ tab of SchedulePress settings, tagged as ‘PROFILE‘.
Now, make sure both the network toggle on the Bluesky card and the profile toggle on your connected account are switched on. Then, click on the ‘Save Changes‘ button. By following these same steps, you can add a new profile and connect multiple Bluesky profiles with SchedulePress as well.
Step 5: Customize the Templates for Your Bluesky Post #
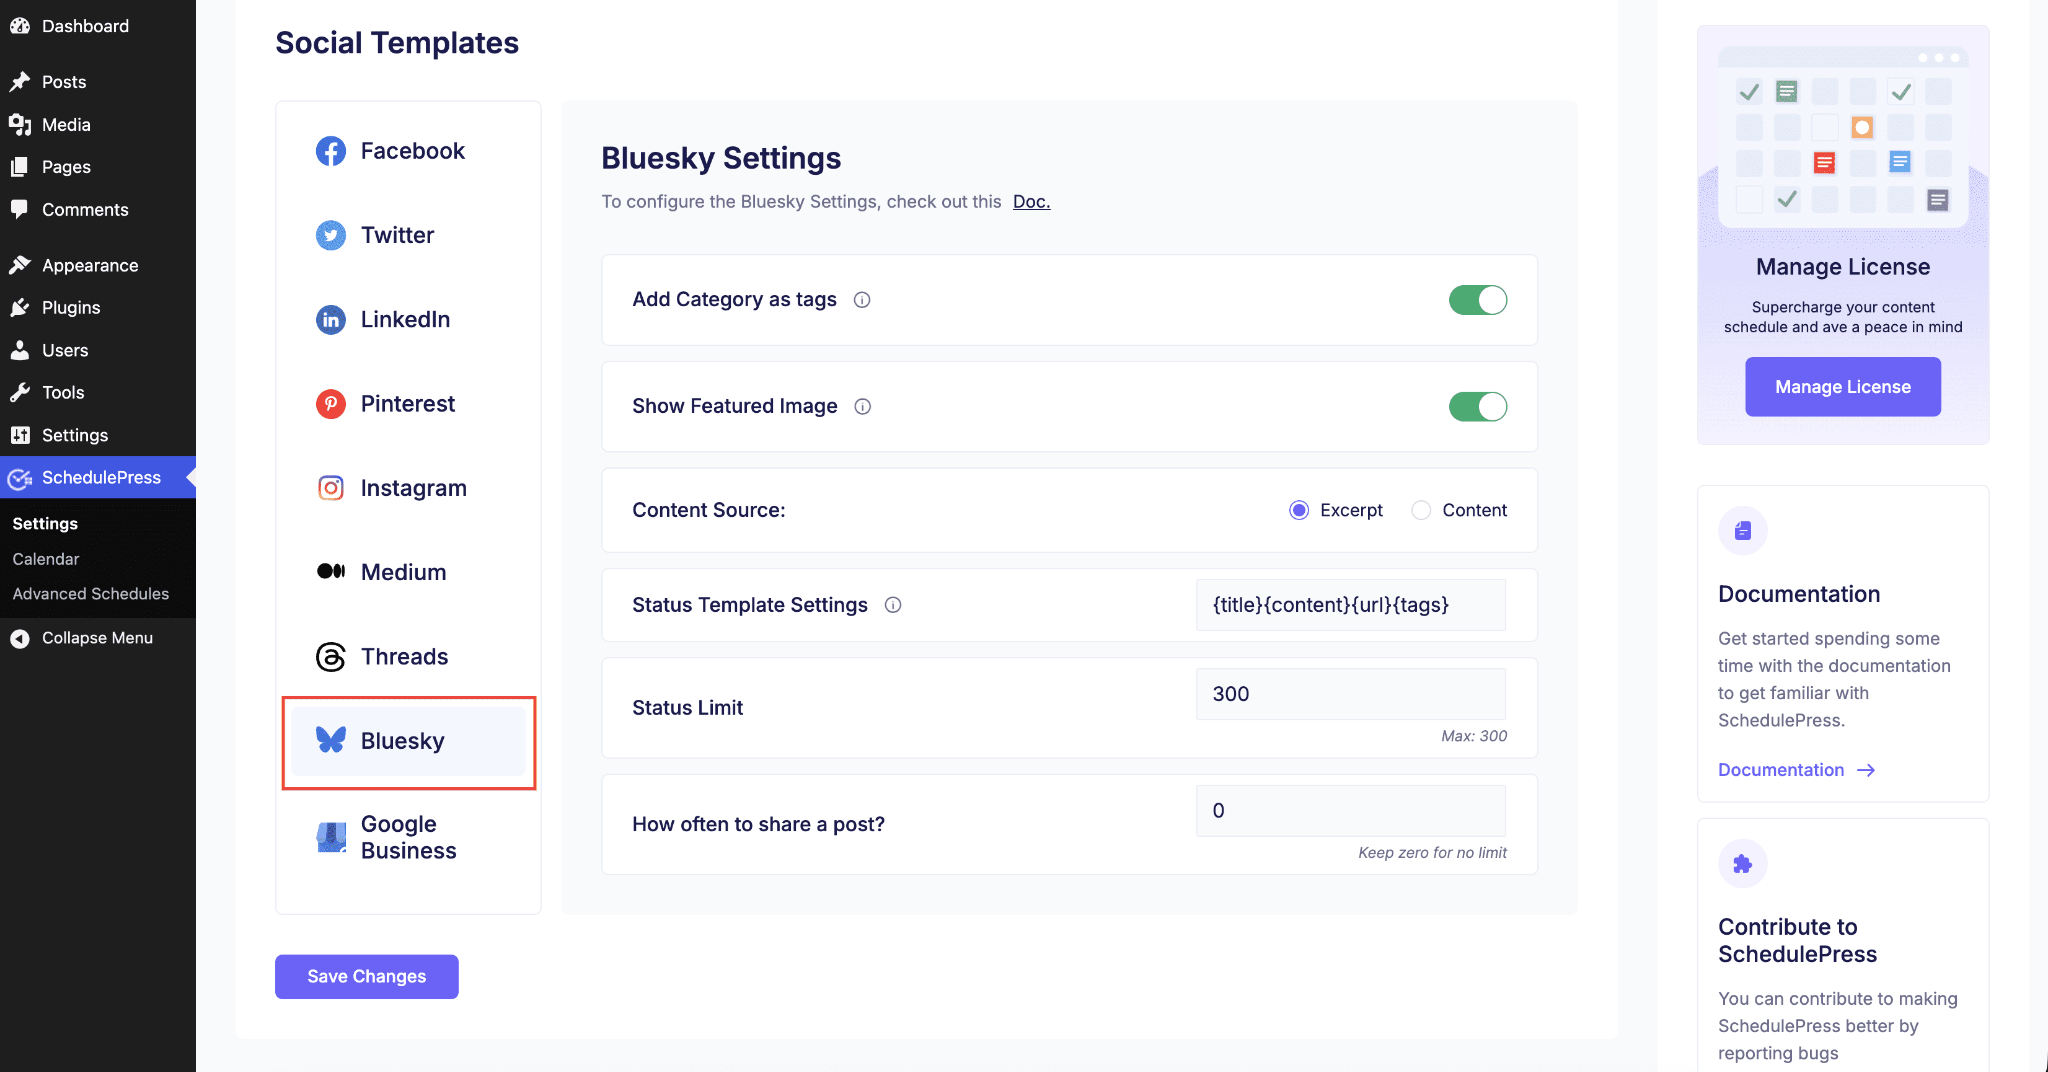
Now go to the next menu, ‘Social Templates‘. Here you will get ‘Add Category as tags‘, ‘Content Source‘, ‘Status Template Settings‘, ‘Status Limit‘ and ‘How often to share a post‘ options. You can use tokens such as {title}, {content}, {url} and {tags} to control exactly what goes out with each post.
Customize them according to your preferences, and try to keep your template short.
Note: Remember that Bluesky allows only 300 characters per post.
Step 6: Automatically Share WordPress Posts on Bluesky #
Now, if you schedule your WordPress post, it will automatically be shared on your Bluesky account. Besides, if you want, you can even instantly share your live post on Bluesky as well.
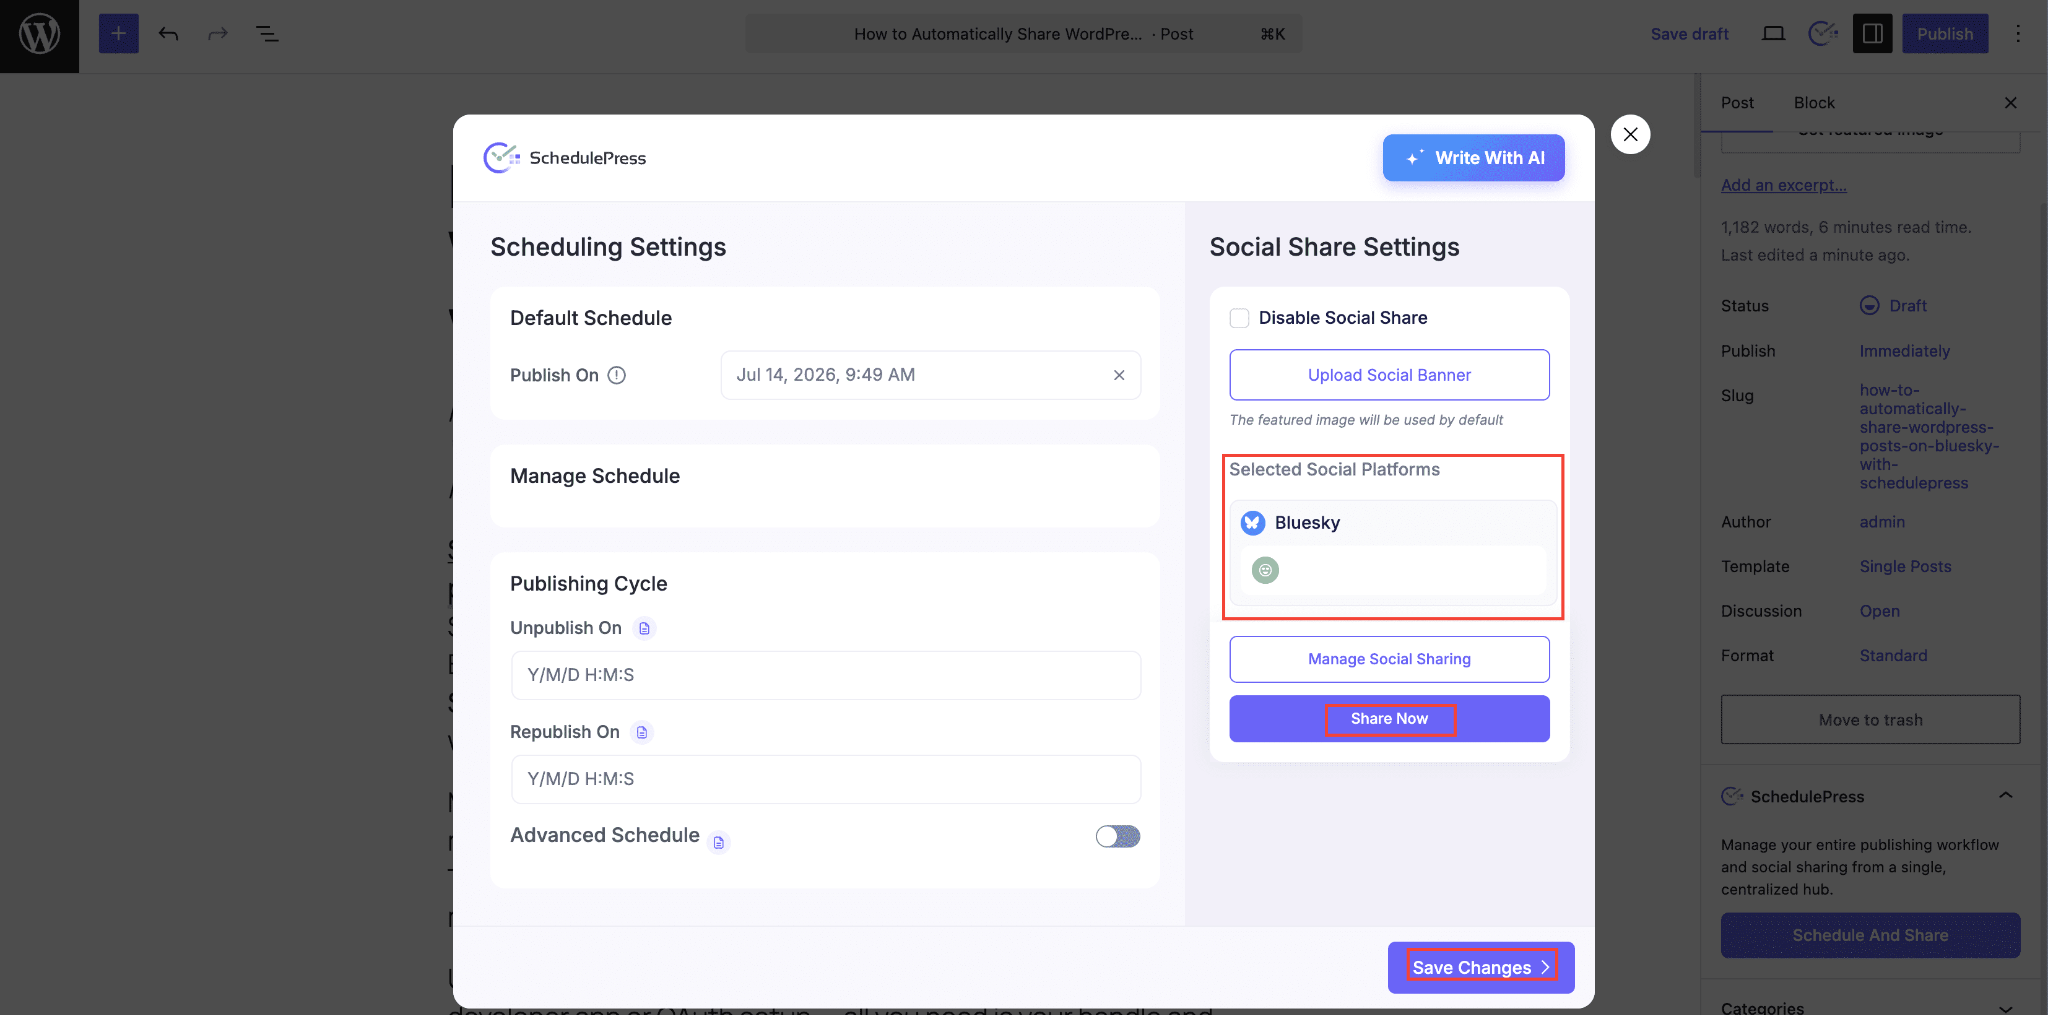
To do this, proceed to edit your post and expand the ‘SchedulePress‘ → ‘Schedule And Share‘ panel from the right side panel.
From the ‘Social Share Settings‘ → ‘Selected Social Platforms‘ section, choose ‘Bluesky‘ along with your connected *.bsky.social profile. Then, hit the ‘Share Now‘ button to instantly share the post on your Bluesky profile, without waiting for the publish or scheduled time.
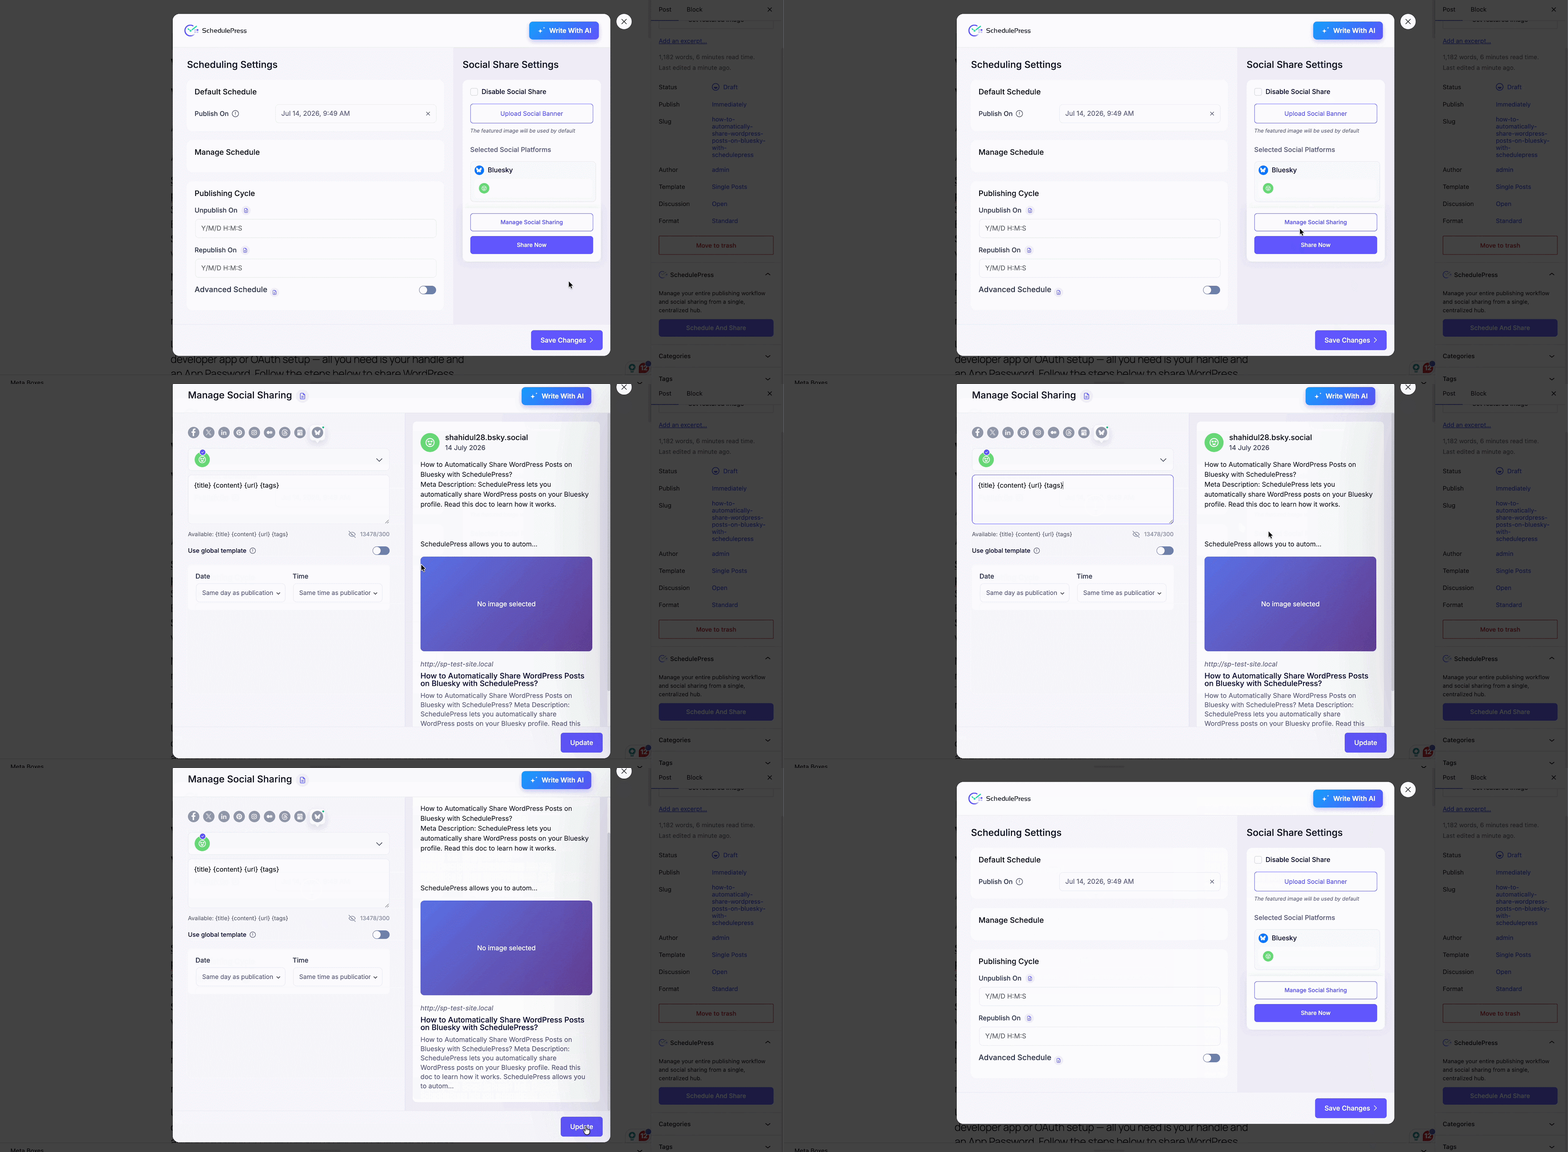
You can also click on the ‘Manage Social Sharing‘ button and select the ‘Bluesky‘ tab to fine-tune the caption for this particular network. Here, a live 300-character counter will show you exactly how much space you have left, along with a live preview of precisely how the post will look on your Bluesky timeline before it is shared.
Now just click on the ‘Update/Publish‘ button, and your post will be shared on your Bluesky account once it goes live.
Final Outcome #
After all of these previous steps are finished, your scheduled posts on WordPress will be automatically shared on your Bluesky account when they go live — with your chosen title, content, link, hashtags and featured image, including a source link back to your WordPress site. This is how it will appear on your Bluesky timeline:
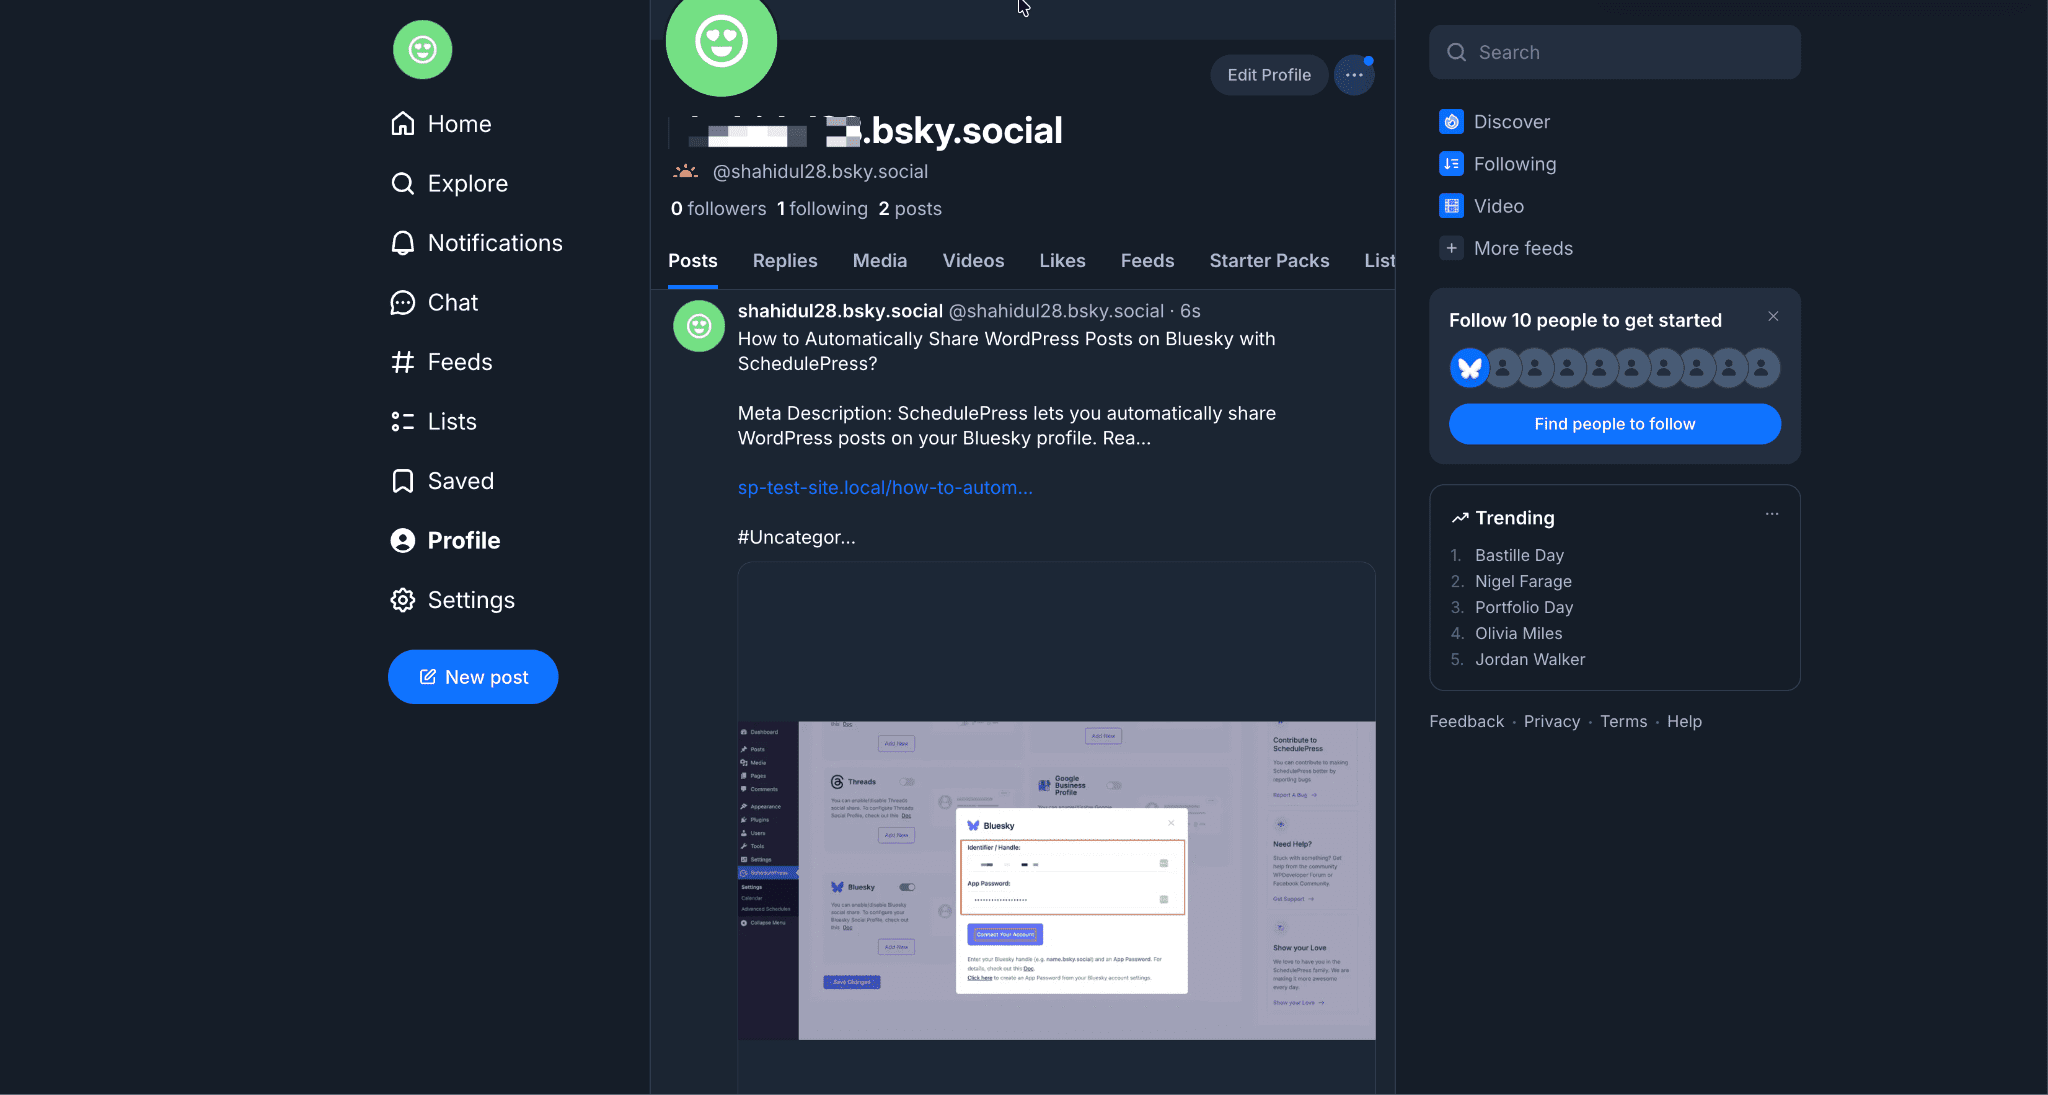
By using SchedulePress, this is how easily you can instantly share WordPress posts on Bluesky from your site.
Getting stuck? Feel free to contact our dedicated support team for any further assistance.
Frequently Faced Issues #
‘Authentication failed’ or the account will not connect: Check that you have used the full handle in the name.bsky.social format, and that the App Password was copied without any extra spaces. If it still fails, regenerate a new App Password from Bluesky and try again.
The post did not get shared: Confirm that both the network toggle and the profile toggle are switched on, that the post is not set to ‘Disable Social Share‘, and that Bluesky is included under ‘Manage Social Sharing‘.
Sharing suddenly stopped working: Your App Password may have been revoked from your Bluesky account. Simply delete the profile in SchedulePress and reconnect it using a newly generated App Password.
The shared text looks cut off: Bluesky allows only 300 characters per post. Shorten your social template from the ‘Social Templates‘ tab.